@TOC
- 麒麟openKylin ----------> ubuntu
- 统信UOS ----------- rocky ------------- centos ----------- rhel
一、==Rocky、Ubuntu、RHEL初始化==
1.最小化安装

2.关闭防火墙
systemctl disable --now firewalld

3.关闭SELinux
vim /etc/selinux/config

SELINUX=disabled
4.重启生效
reboot

5. 实现邮件通信
yum -y install postfix mailx
systemctl enable --now postfix

6. yum 源
CentOS8 : BaseOS , appstream,epel
CentOS7:  BaseOS, epel

7. 最小化安装常用软件:


8. 网卡NAT
地址:10.0.0.X/24 GATEWAY:10.0.0.2,dns:10.0.0.2,180.76.76.76
名称修改:ethX

9. 时间同步
1.1.最小化安装
1.2.关闭防火墙
#关闭防火墙,为了学习方便。
systemctl stop firewalld ##关闭防火墙
systemctl disable firewalld ##禁止开机自启动
systemctl status firewalld ##查看关闭结果
systemctl disable --now firewalld# centos6
service iptables stop
chkconfig iptables off1.3.关闭SELinux
##关闭selinux,它是一个安全模块,不关闭,老管着你。
setenforce 0 ##临时关闭selinux
getenforce ##查看是否关闭
sed -i 's#SELINUX=enforcing#SELINUX=disabled#g' /etc/selinux/config ##永久关闭
vim /etc/selinux/config
SELINUX=disabled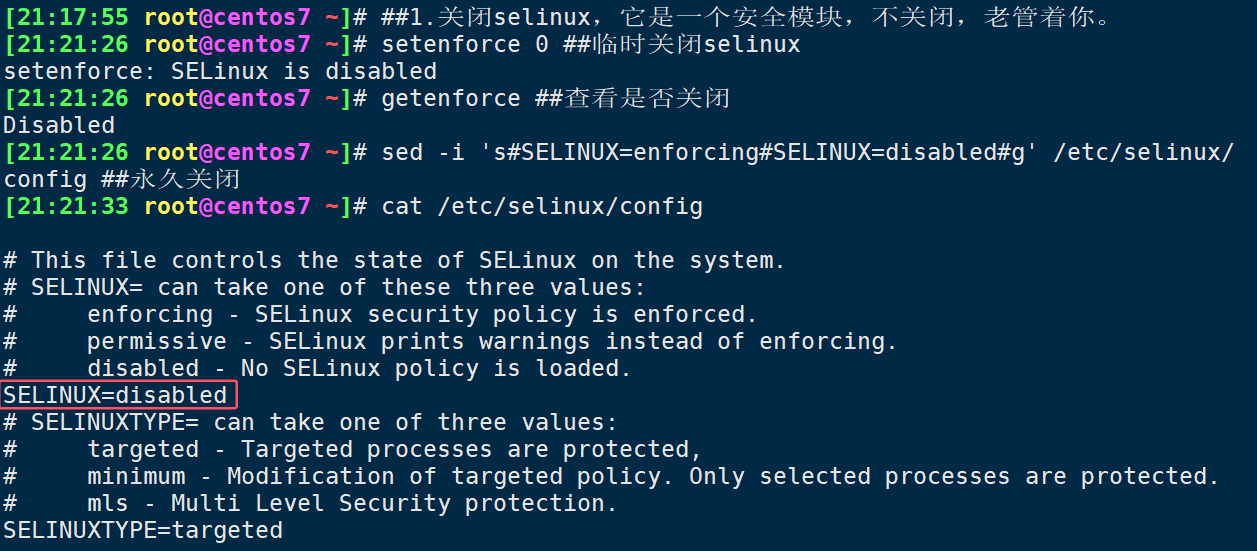
1.4.重启生效
reboot1.5. 实现邮件通信
yum -y install postfix mailx
systemctl enable --now postfix
1.6. yum 源 和dnf
CentOS8 : BaseOS , appstream,epel
CentOS7:  BaseOS, epel
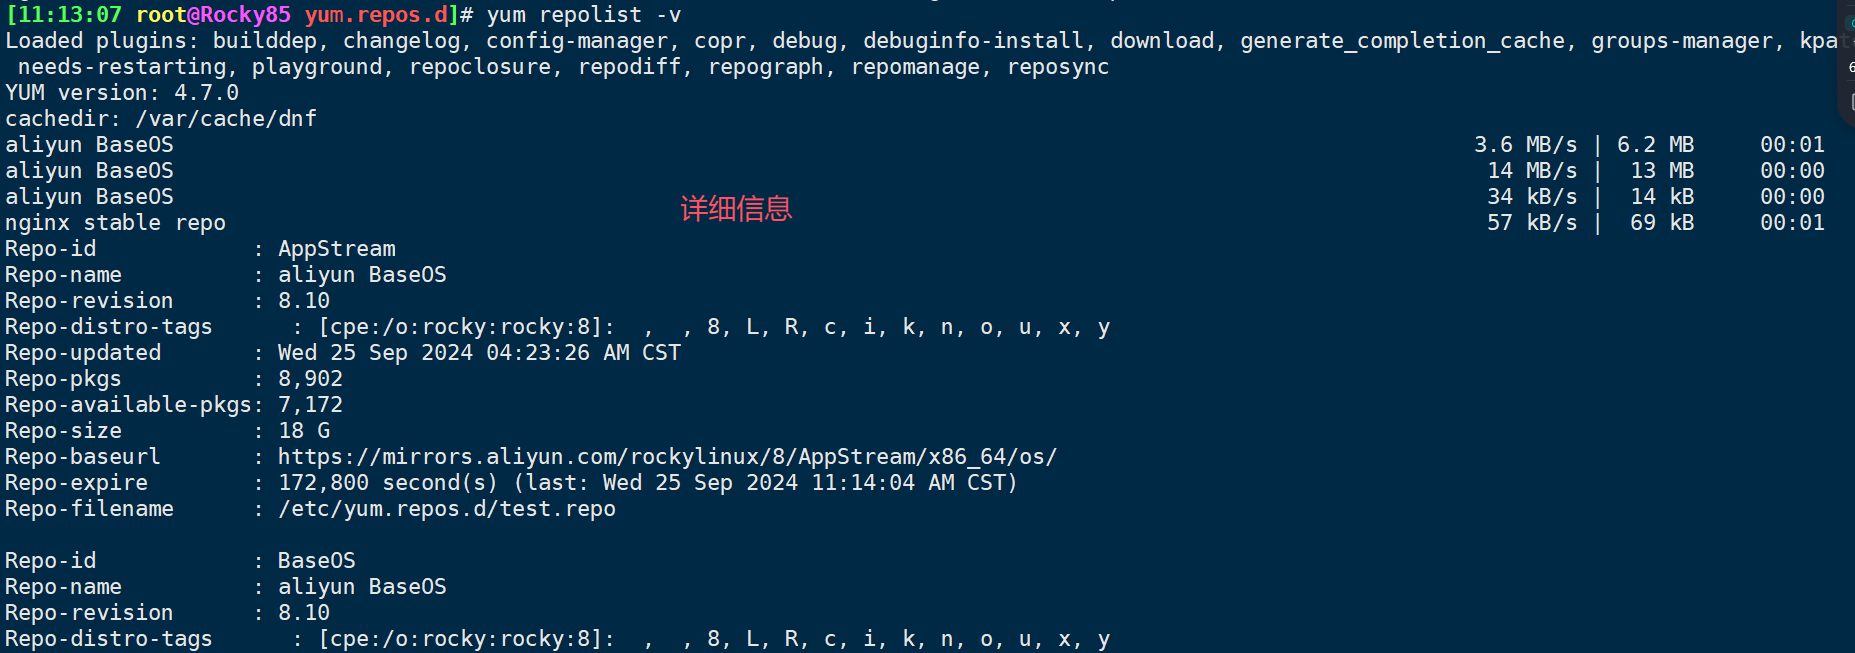
yum install remove repolist list search provides history clean all
yum clean all # 清缓存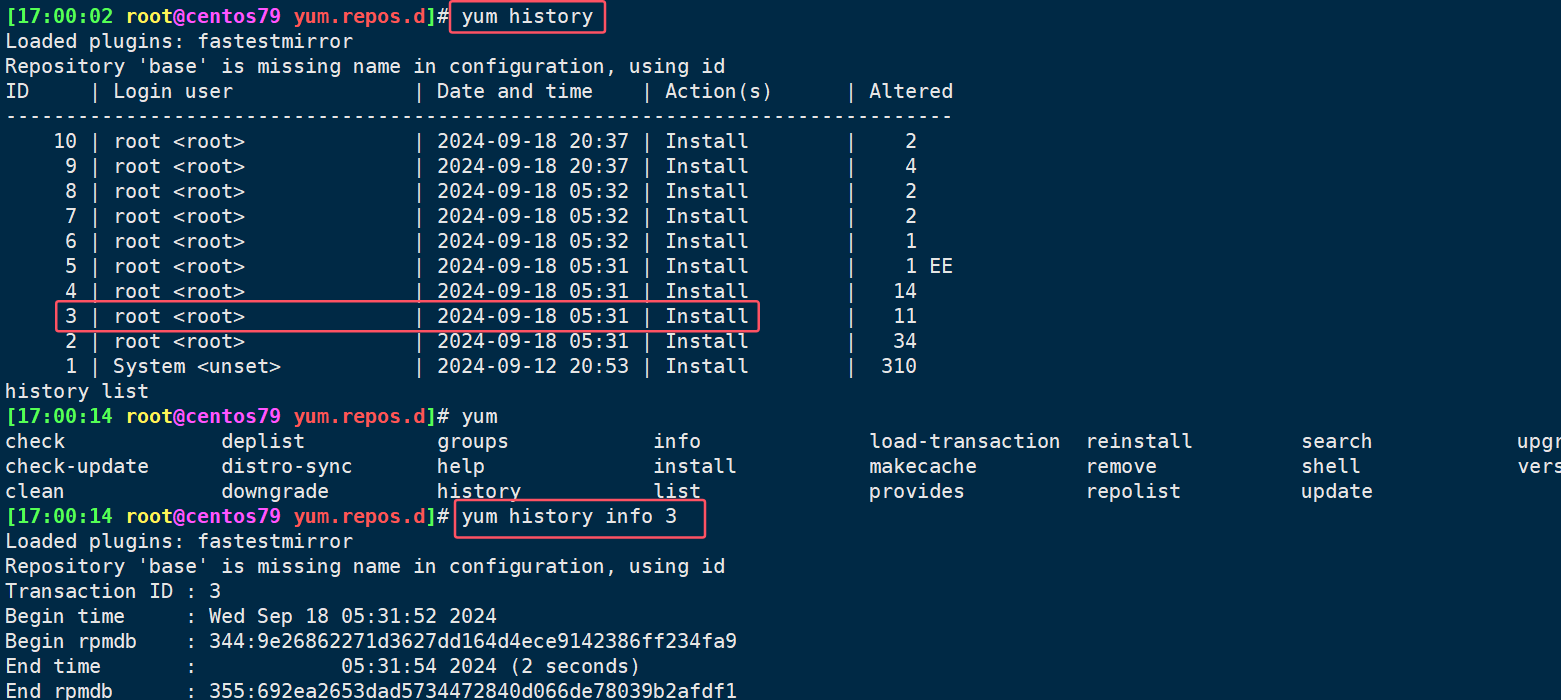
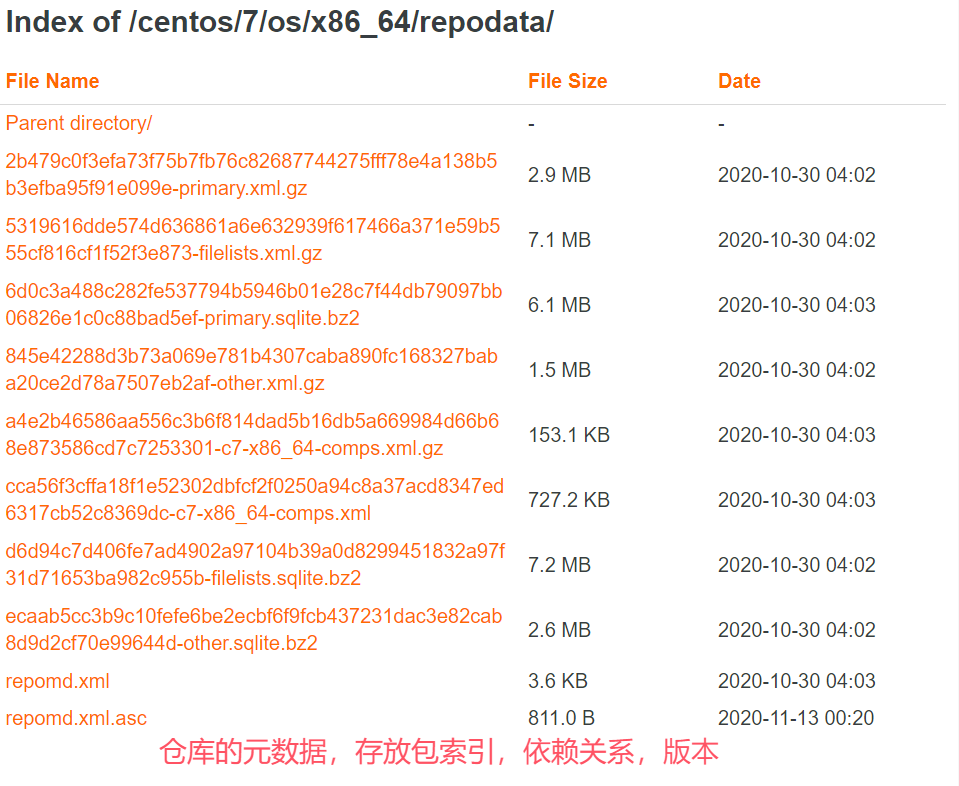
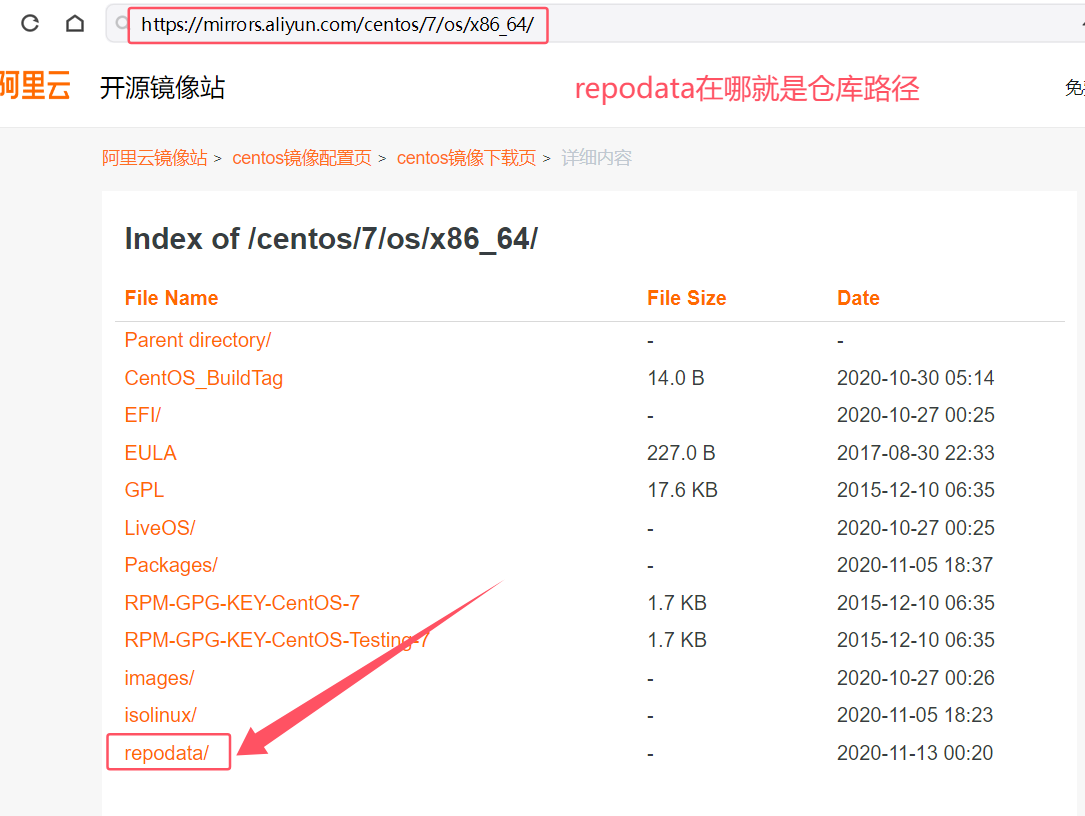
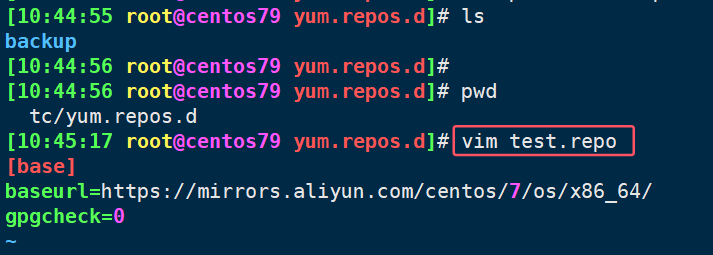
1.6.1.配置yum源
/etc/yum.repos.d/xxx.repo
[repoid] 唯一
name=说明
baseurl=http:// https:// ftp:// file://
gpgcheck=0
enabled=1
#gpgkey=
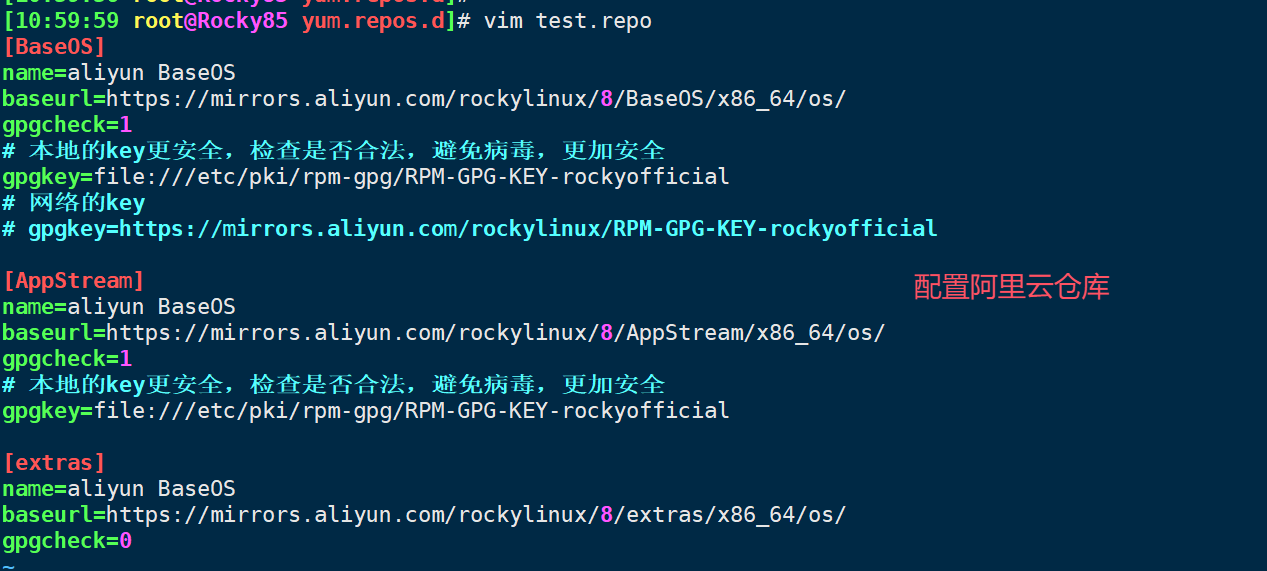
cd /etc/yum.repos.d[11:53:05 root@Rocky85 yum.repos.d]# cat test.repo
[BaseOS]
name=aliyun BaseOS
baseurl=https://mirrors.aliyun.com/rockylinux/8/BaseOS/x86_64/os/
gpgcheck=1
# 本地的key更安全,检查是否合法,避免病毒,更加安全
gpgkey=file:///etc/pki/rpm-gpg/RPM-GPG-KEY-rockyofficial
# 网络的key
# gpgkey=https://mirrors.aliyun.com/rockylinux/RPM-GPG-KEY-rockyofficial
[AppStream]
name=aliyun BaseOS
baseurl=https://mirrors.aliyun.com/rockylinux/8/AppStream/x86_64/os/
gpgcheck=1
# 本地的key更安全,检查是否合法,避免病毒,更加安全
gpgkey=file:///etc/pki/rpm-gpg/RPM-GPG-KEY-rockyofficial
[extras]
name=aliyun extras
baseurl=https://mirrors.aliyun.com/rockylinux/8/extras/x86_64/os/
gpgcheck=0
[epel]
name=aliyun epel
baseurl=https://mirrors.aliyun.com/epel/8/Everything/x86_64/
gpgcheck=0
[nginx-stable]
name=nginx stable repo
baseurl=http://nginx.org/packages/centos/$releasever/$basearch/
gpgcheck=1
enabled=0
gpgkey=https://nginx.org/keys/nginx_signing.key
module_hotfixes=true






1.6.2.只下载安装包,不安装
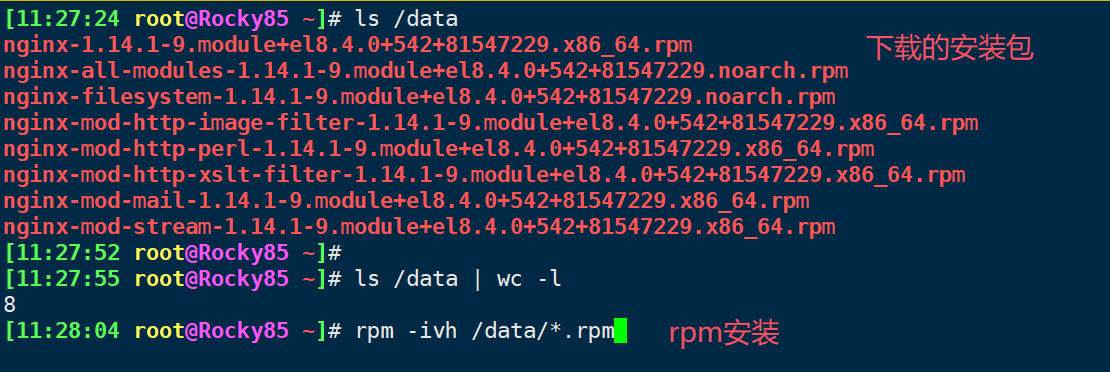
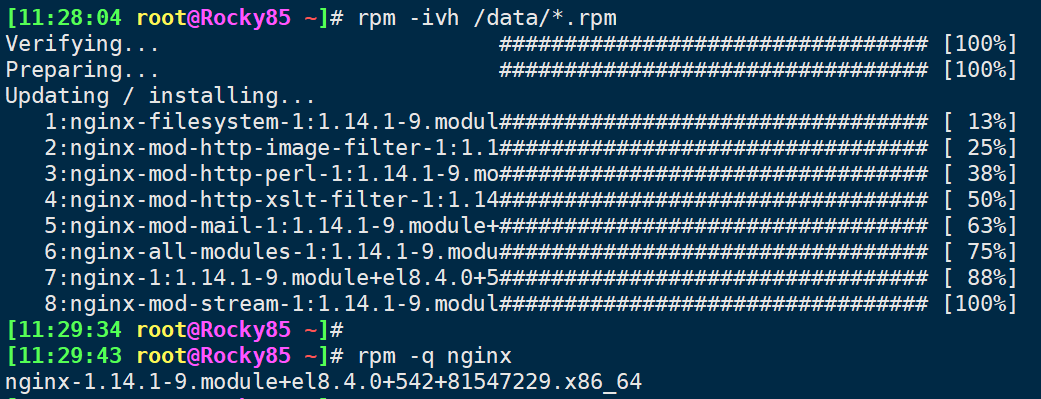
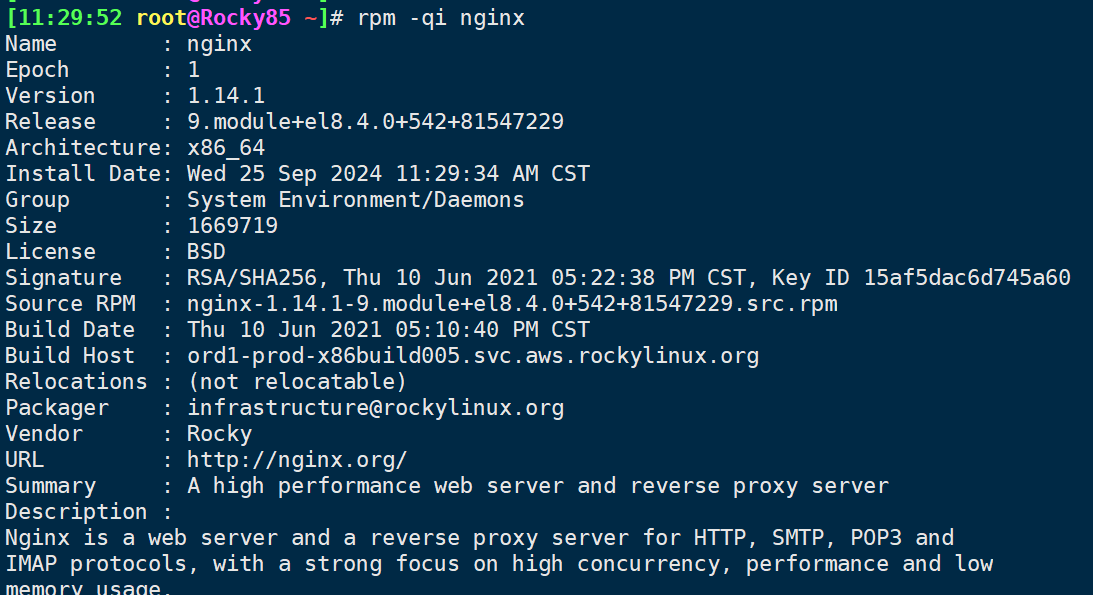
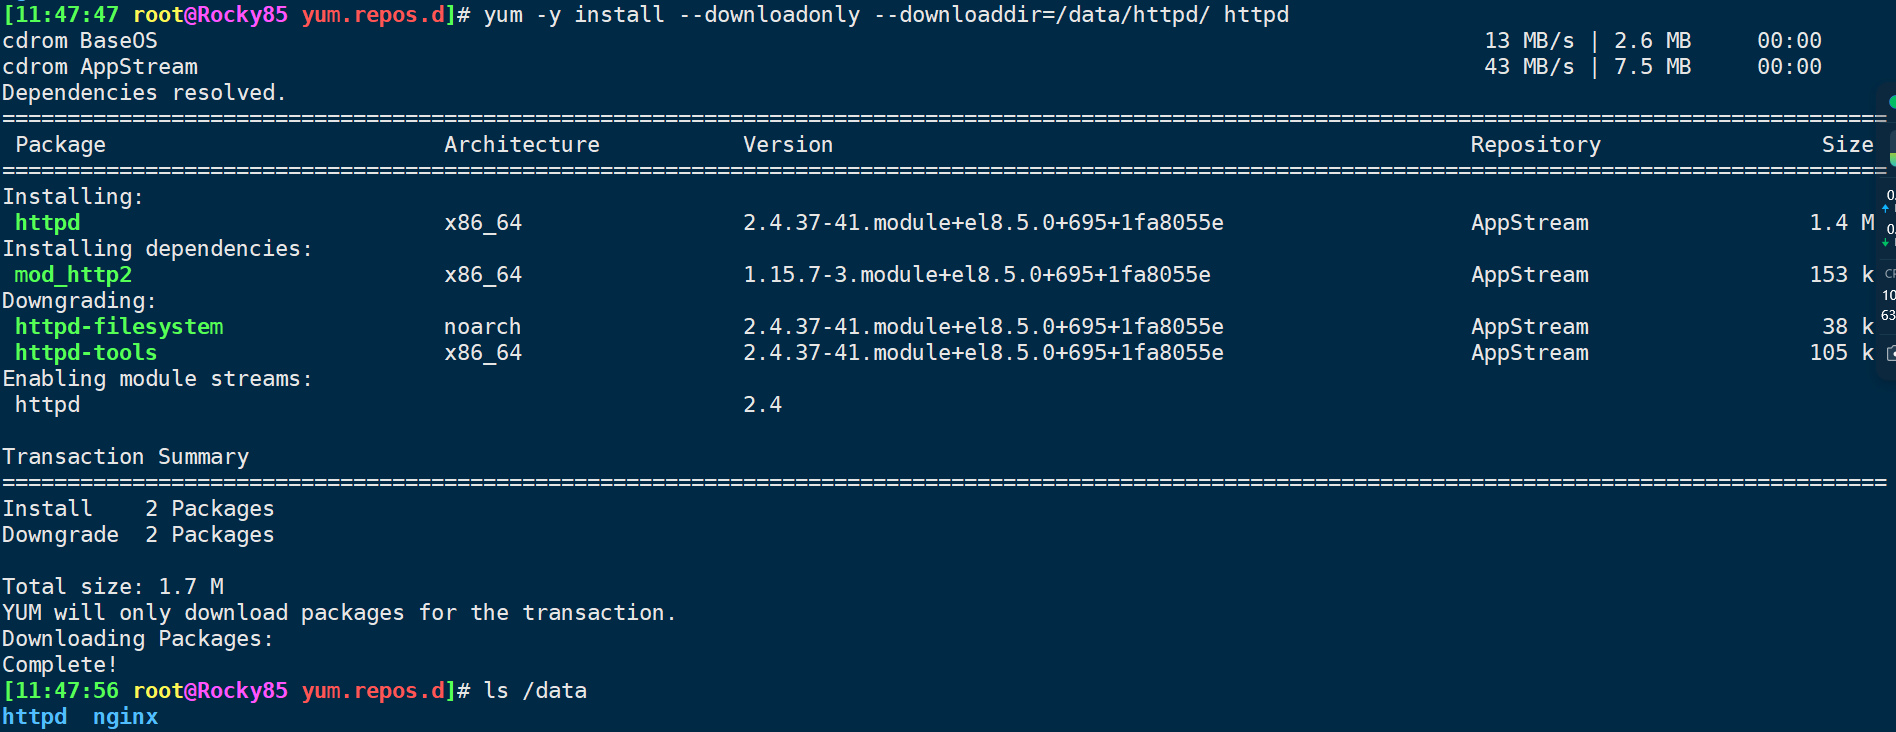
yum -y install --downloadonly --downloaddir=/data/nginx/ nginx

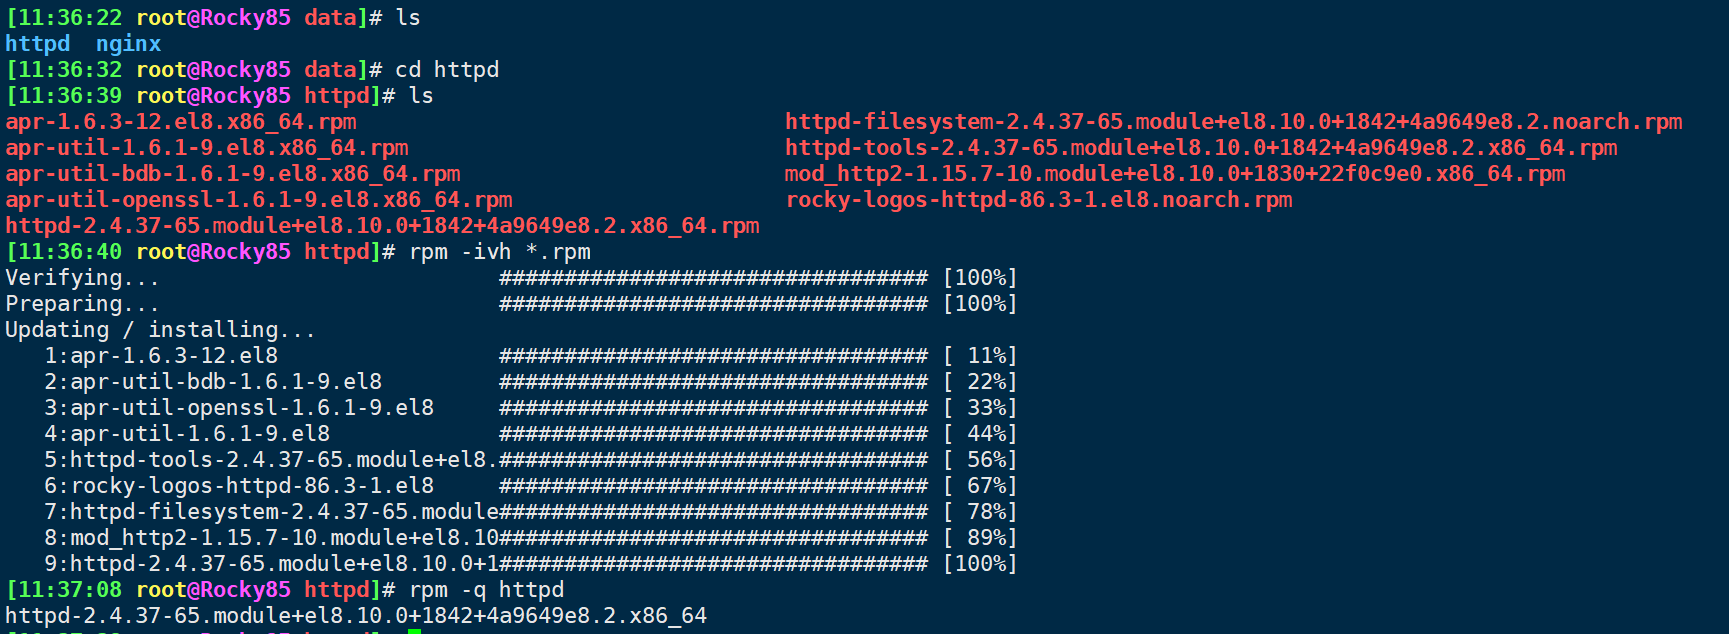
yum -y install --downloadonly --downloaddir=/data/httpd/ httpd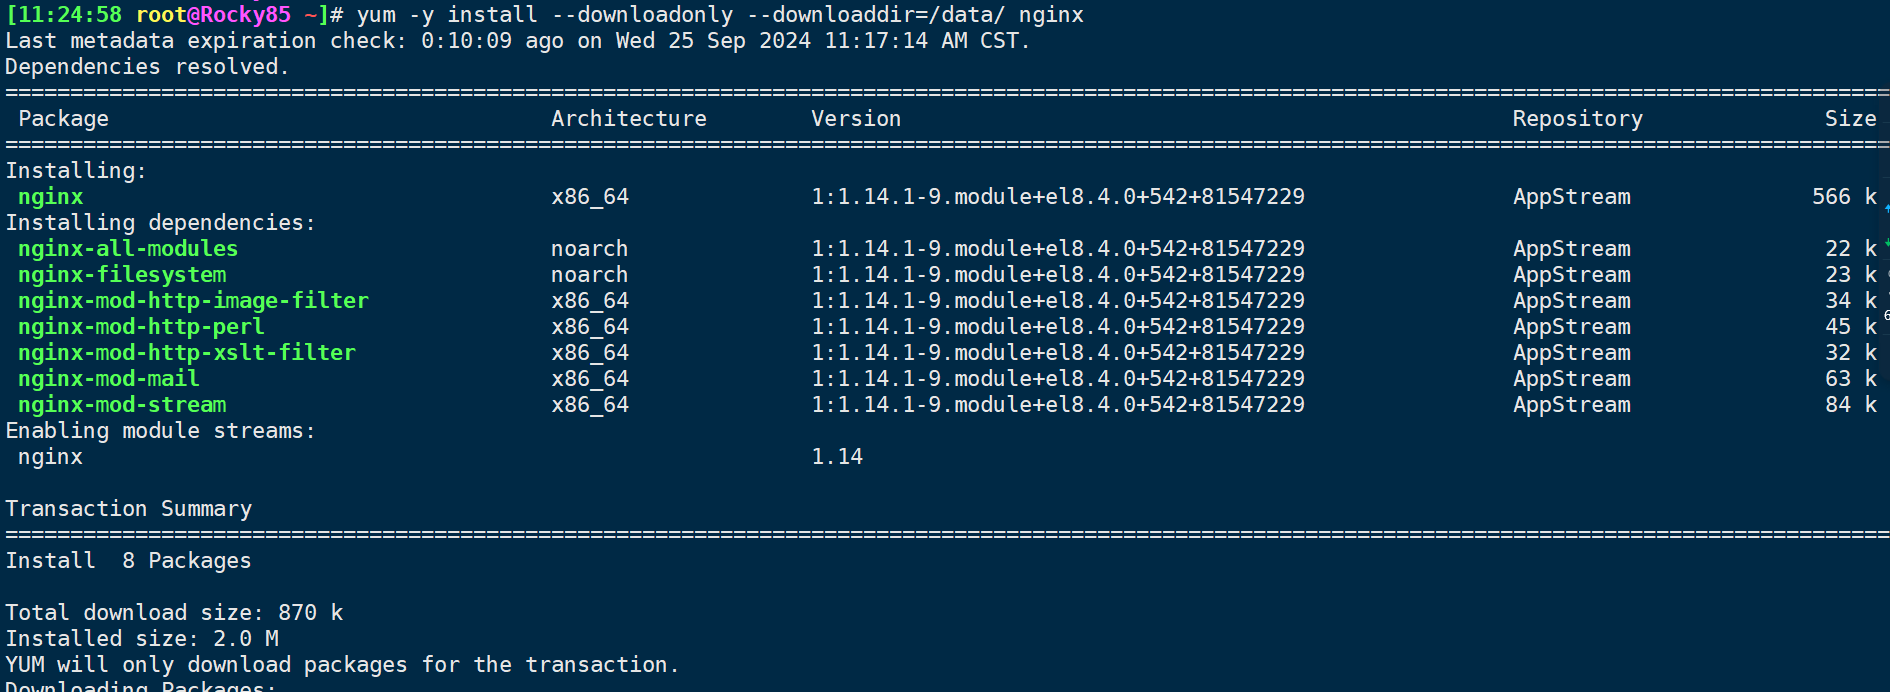

1.6.3.配置本地光盘ISO文件安装
# 自动挂载光盘
yum -y install autofs
systemctl enable --now autofs
# 访问
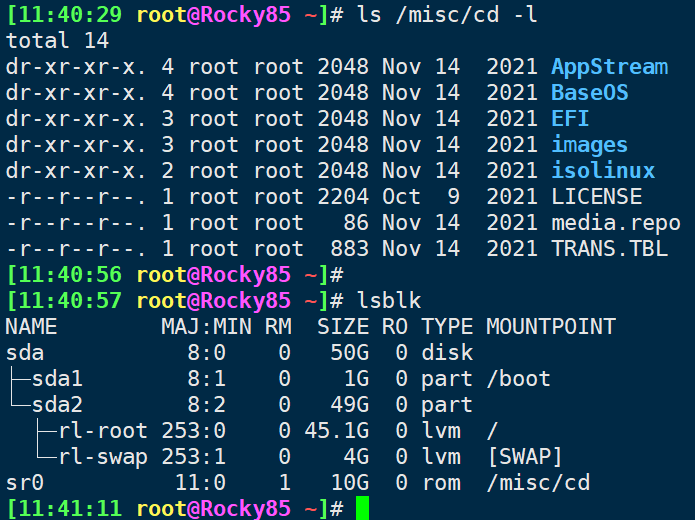
lsblk
ls /misc/cd
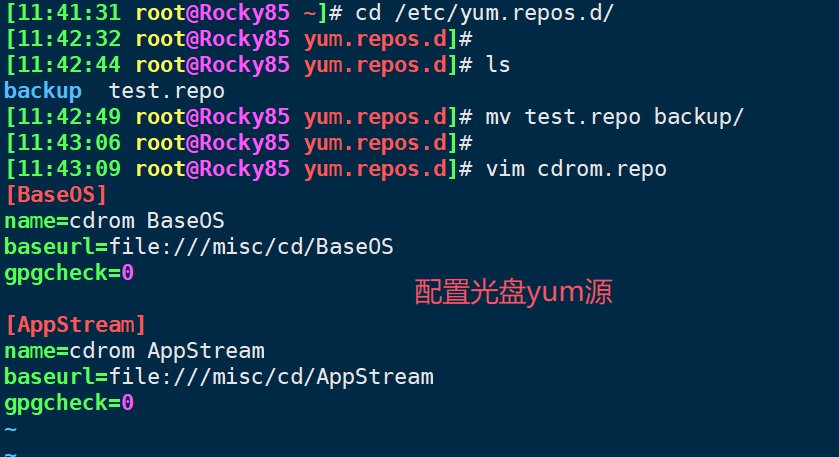
[11:52:58 root@Rocky85 yum.repos.d]# cat cdrom.repo
[BaseOS]
name=cdrom BaseOS
baseurl=file:///misc/cd/BaseOS
gpgcheck=0
[AppStream]
name=cdrom AppStream
baseurl=file:///misc/cd/AppStream
gpgcheck=0

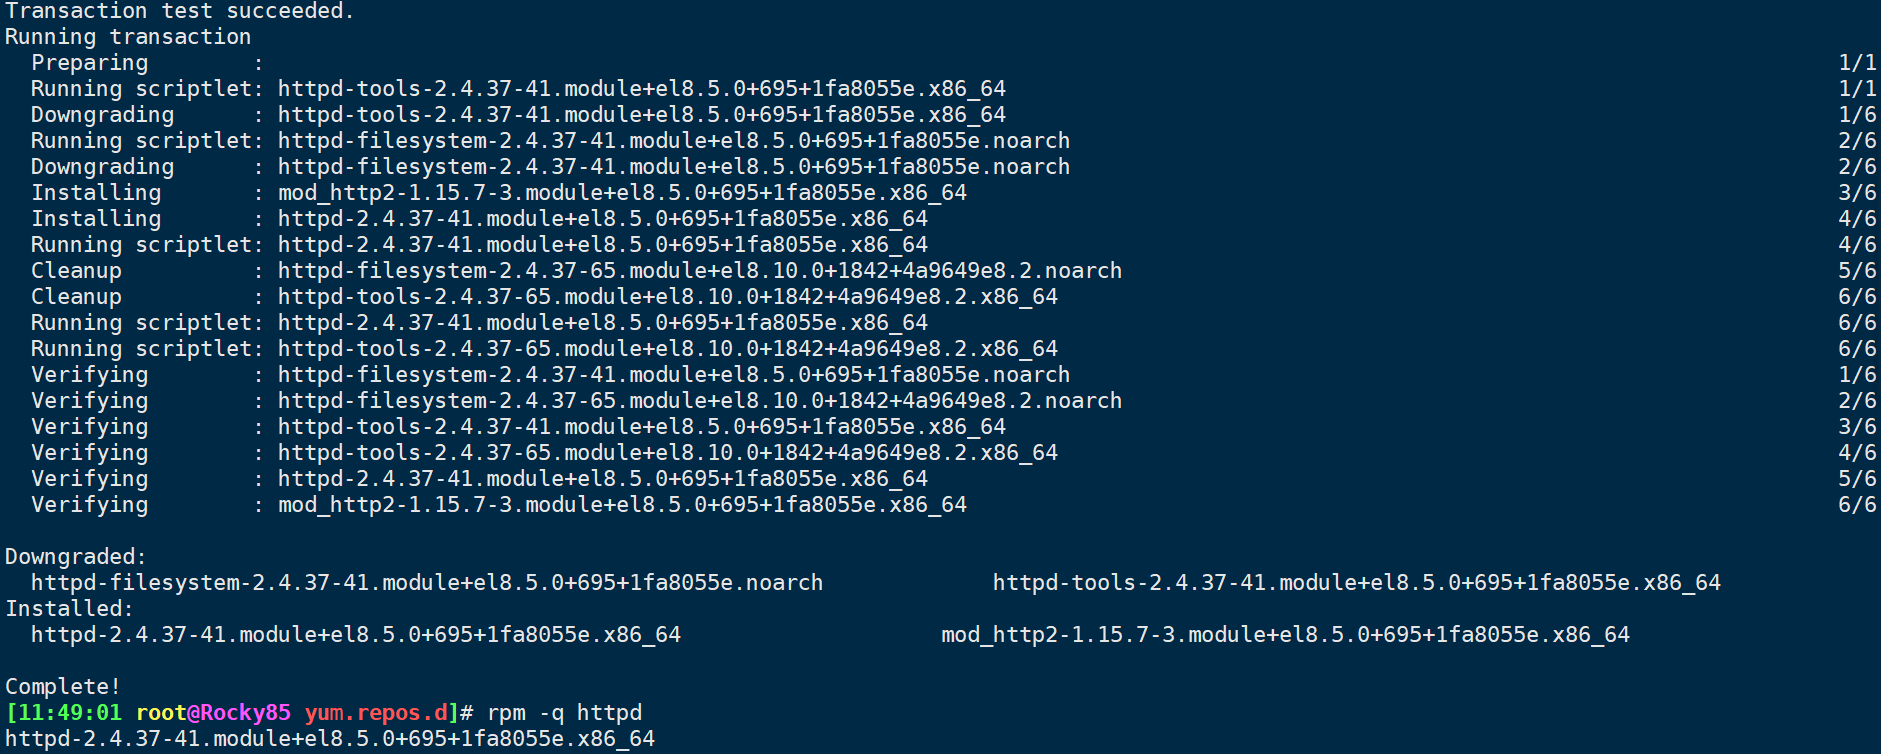
1.6.4.配置阿里云epel源
[11:58:20 root@Rocky85 yum.repos.d]# vim cdrom.repo
[BaseOS]
name=cdrom BaseOS
baseurl=file:///misc/cd/BaseOS
gpgcheck=0

[AppStream]
name=cdrom AppStream
baseurl=file:///misc/cd/AppStream
gpgcheck=0

[extras]
name=aliyun extras
baseurl=https://mirrors.aliyun.com/rockylinux/8/extras/x86_64/os/
gpgcheck=0

[epel]
name=aliyun epel
baseurl=https://mirrors.aliyun.com/epel/8/Everything/x86_64/
gpgcheck=0

1.6.5.base-for-centos6.repo
# 备份
mv /etc/yum.repos.d/CentOS-Base.repo /etc/yum.repos.d/CentOS-Base.repo.backup
# centos6(centos6官方源已下线,建议切换centos-vault源)
wget -O /etc/yum.repos.d/CentOS-Base.repo https://mirrors.aliyun.com/repo/Centos-vault-6.10.repo
curl -o /etc/yum.repos.d/CentOS-Base.repo https://mirrors.aliyun.com/repo/Centos-vault-6.10.repo
1.6.6.base-for-centos7.repo
1.6.6.1.打补丁安装常用工具
1.6.6.1.a.配置软件下载,将从官方下载改到阿里云地址下载:
curl -s -o /etc/yum.repos.d/CentOS-Base.repo http://mirrors.aliyun.com/repo/Centos-7.repo成功标志,就是没有反应。
1.6.6.1.b.配置第三方的软件下载的epel源更新地址为阿里云的地址:
curl -s -o /etc/yum.repos.d/epel.repo http://mirrors.aliyun.com/repo/epel-7.repo成功标志,就是没有反应。
1.6.6.1.c.CentOS7要安装的企业运维常用基础工具包
yum install psmisc bash-completion lrzsz wget -y1.6.6.2.base-for-centos7.repo
[base]
name=base
baseurl=https://mirrors.aliyun.com/centos/\$releasever/os/\$basearch/
        https://mirrors.huaweicloud.com/centos/\$releasever/os/\$basearch/
        https://mirrors.cloud.tencent.com/centos/\$releasever/os/\$basearch/
        https://mirrors.tuna.tsinghua.edu.cn/centos/\$releasever/os/\$basearch/
        http://mirrors.163.com/centos/\$releasever/os/\$basearch/
        http://mirrors.sohu.com/centos/\$releasever/os/\$basearch/
gpgcheck=1
gpgkey=file:///etc/pki/rpm-gpg/RPM-GPG-KEY-CentOS-\$releasever

[epel]
name=epel
baseurl=https://mirrors.aliyun.com/epel/\$releasever/\$basearch/
        https://mirrors.huaweicloud.com/epel/\$releasever/\$basearch/
        https://mirrors.cloud.tencent.com/epel/\$releasever/\$basearch/
        https://mirrors.tuna.tsinghua.edu.cn/epel/\$releasever/\$basearch/
gpgcheck=1
gpgkey=https://mirrors.aliyun.com/epel/RPM-GPG-KEY-EPEL-\$releasever

[extras]
name=extras
baseurl=https://mirrors.aliyun.com/centos/\$releasever/extras/\$basearch/
        https://mirrors.huaweicloud.com/centos/\$releasever/extras/\$basearch/
        https://mirrors.cloud.tencent.com/centos/\$releasever/extras/\$basearch/
        https://mirrors.tuna.tsinghua.edu.cn/centos/\$releasever/extras/\$basearch/
        http://mirrors.163.com/centos/\$releasever/extras/\$basearch/
        http://mirrors.sohu.com/centos/\$releasever/extras/\$basearch/
gpgcheck=1
gpgkey=file:///etc/pki/rpm-gpg/RPM-GPG-KEY-CentOS-\$releasever

[updates]
name=updates
baseurl=https://mirrors.aliyun.com/centos/\$releasever/updates/\$basearch/
        https://mirrors.huaweicloud.com/centos/\$releasever/updates/\$basearch/
        https://mirrors.cloud.tencent.com/centos/\$releasever/updates/\$basearch/
        https://mirrors.tuna.tsinghua.edu.cn/centos/\$releasever/updates/\$basearch/
        http://mirrors.163.com/centos/\$releasever/updates/\$basearch/
        http://mirrors.sohu.com/centos/\$releasever/updates/\$basearch/
gpgcheck=1
gpgkey=file:///etc/pki/rpm-gpg/RPM-GPG-KEY-CentOS-\$releasever

[centosplus]
name=centosplus
baseurl=https://mirrors.aliyun.com/centos/\$releasever/centosplus/\$basearch/
        https://mirrors.huaweicloud.com/centos/\$releasever/centosplus/\$basearch/
        https://mirrors.cloud.tencent.com/centos/\$releasever/centosplus/\$basearch/
        https://mirrors.tuna.tsinghua.edu.cn/centos/\$releasever/centosplus/\$basearch/
        http://mirrors.163.com/centos/\$releasever/centosplus/\$basearch/
        http://mirrors.sohu.com/centos/\$releasever/centosplus/\$basearch/
gpgcheck=1
gpgkey=file:///etc/pki/rpm-gpg/RPM-GPG-KEY-CentOS-\$releasever
[base]
name=base
baseurl=https://mirrors.aliyun.com/centos/$releasever/os/$basearch/
https://mirrors.huaweicloud.com/centos/$releasever/os/$basearch/
https://mirrors.cloud.tencent.com/centos/$releasever/os/$basearch/
https://mirrors.tuna.tsinghua.edu.cn/centos/$releasever/os/$basearch/
http://mirrors.163.com/centos/$releasever/os/$basearch/
http://mirrors.sohu.com/centos/$releasever/os/$basearch/
gpgcheck=1
gpgkey=file:///etc/pki/rpm-gpg/RPM-GPG-KEY-CentOS-$releasever
[epel]
name=epel
baseurl=https://mirrors.aliyun.com/epel/$releasever/$basearch/
https://mirrors.huaweicloud.com/epel/$releasever/$basearch/
https://mirrors.cloud.tencent.com/epel/$releasever/$basearch/
https://mirrors.tuna.tsinghua.edu.cn/epel/$releasever/$basearch/
gpgcheck=1
gpgkey=https://mirrors.aliyun.com/epel/RPM-GPG-KEY-EPEL-$releasever
[extras]
name=extras
baseurl=https://mirrors.aliyun.com/centos/$releasever/extras/$basearch/
https://mirrors.huaweicloud.com/centos/$releasever/extras/$basearch/
https://mirrors.cloud.tencent.com/centos/$releasever/extras/$basearch/
https://mirrors.tuna.tsinghua.edu.cn/centos/$releasever/extras/$basearch/
http://mirrors.163.com/centos/$releasever/extras/$basearch/
http://mirrors.sohu.com/centos/$releasever/extras/$basearch/
gpgcheck=1
gpgkey=file:///etc/pki/rpm-gpg/RPM-GPG-KEY-CentOS-$releasever
[updates]
name=updates
baseurl=https://mirrors.aliyun.com/centos/$releasever/updates/$basearch/
https://mirrors.huaweicloud.com/centos/$releasever/updates/$basearch/
https://mirrors.cloud.tencent.com/centos/$releasever/updates/$basearch/
https://mirrors.tuna.tsinghua.edu.cn/centos/$releasever/updates/$basearch/
http://mirrors.163.com/centos/$releasever/updates/$basearch/
http://mirrors.sohu.com/centos/$releasever/updates/$basearch/
gpgcheck=1
gpgkey=file:///etc/pki/rpm-gpg/RPM-GPG-KEY-CentOS-$releasever
[centosplus]
name=centosplus
baseurl=https://mirrors.aliyun.com/centos/$releasever/centosplus/$basearch/
https://mirrors.huaweicloud.com/centos/$releasever/centosplus/$basearch/
https://mirrors.cloud.tencent.com/centos/$releasever/centosplus/$basearch/
https://mirrors.tuna.tsinghua.edu.cn/centos/$releasever/centosplus/$basearch/
http://mirrors.163.com/centos/$releasever/centosplus/$basearch/
http://mirrors.sohu.com/centos/$releasever/centosplus/$basearch/
gpgcheck=1
gpgkey=file:///etc/pki/rpm-gpg/RPM-GPG-KEY-CentOS-$releasever1.6.7.base-for-rocky8.repo
[BaseOS]
name=BaseOS
baseurl=https://mirrors.aliyun.com/centos/\$releasever/BaseOS/\$basearch/os/
        https://mirrors.huaweicloud.com/centos/\$releasever/BaseOS/\$basearch/os/
        https://mirrors.cloud.tencent.com/centos/\$releasever/BaseOS/\$basearch/os/
        https://mirrors.tuna.tsinghua.edu.cn/centos/\$releasever/BaseOS/\$basearch/os/
        http://mirrors.163.com//centos/\$releasever/BaseOS/\$basearch/os/
        http://mirrors.sohu.com/centos/\$releasever/BaseOS/\$basearch/os/
gpgcheck=1
gpgkey=file:///etc/pki/rpm-gpg/RPM-GPG-KEY-centosofficial

[AppStream]
name=AppStream
baseurl=https://mirrors.aliyun.com/centos/\$releasever/AppStream/\$basearch/os/
        https://mirrors.huaweicloud.com/centos/\$releasever/AppStream/\$basearch/os/
        https://mirrors.cloud.tencent.com/centos/\$releasever/AppStream/\$basearch/os/
        https://mirrors.tuna.tsinghua.edu.cn/centos/\$releasever/AppStream/\$basearch/os/
        http://mirrors.163.com/centos/\$releasever/AppStream/\$basearch/os/
        http://mirrors.sohu.com/centos/\$releasever/AppStream/\$basearch/os/
gpgcheck=1
gpgkey=file:///etc/pki/rpm-gpg/RPM-GPG-KEY-centosofficial

[EPEL]
name=EPEL
baseurl=https://mirrors.aliyun.com/epel/\$releasever/Everything/\$basearch/
        https://mirrors.huaweicloud.com/epel/\$releasever/Everything/\$basearch/
        https://mirrors.cloud.tencent.com/epel/\$releasever/Everything/\$basearch/
        https://mirrors.tuna.tsinghua.edu.cn/epel/\$releasever/Everything/\$basearch/
gpgcheck=1
gpgkey=https://mirrors.aliyun.com/epel/RPM-GPG-KEY-EPEL-\$releasever

[extras]
name=extras
baseurl=https://mirrors.aliyun.com/centos/\$releasever/extras/\$basearch/os/
        https://mirrors.huaweicloud.com/centos/\$releasever/extras/\$basearch/os/
        https://mirrors.cloud.tencent.com/centos/\$releasever/extras/\$basearch/os/
        https://mirrors.tuna.tsinghua.edu.cn/centos/\$releasever/extras/\$basearch/os/
        http://mirrors.163.com/centos/\$releasever/extras/\$basearch/os/
        http://mirrors.sohu.com/centos/\$releasever/extras/\$basearch/os/
gpgcheck=1
gpgkey=file:///etc/pki/rpm-gpg/RPM-GPG-KEY-centosofficial
enabled=1

[centosplus]
name=centosplus
baseurl=https://mirrors.aliyun.com/centos/\$releasever/centosplus/\$basearch/os/
        https://mirrors.huaweicloud.com/centos/\$releasever/centosplus/\$basearch/os/
        https://mirrors.cloud.tencent.com/centos/\$releasever/centosplus/\$basearch/os/
        https://mirrors.tuna.tsinghua.edu.cn/centos/\$releasever/centosplus/\$basearch/os/
        http://mirrors.163.com/centos/\$releasever/centosplus/\$basearch/os/
        http://mirrors.sohu.com/centos/\$releasever/centosplus/\$basearch/os/
gpgcheck=1
gpgkey=file:///etc/pki/rpm-gpg/RPM-GPG-KEY-centosofficial
[BaseOS]
name=BaseOS
baseurl=https://mirrors.aliyun.com/centos/$releasever/BaseOS/$basearch/os/
https://mirrors.huaweicloud.com/centos/$releasever/BaseOS/$basearch/os/
https://mirrors.cloud.tencent.com/centos/$releasever/BaseOS/$basearch/os/
https://mirrors.tuna.tsinghua.edu.cn/centos/$releasever/BaseOS/$basearch/os/
http://mirrors.163.com//centos/$releasever/BaseOS/$basearch/os/
http://mirrors.sohu.com/centos/$releasever/BaseOS/$basearch/os/
gpgcheck=1
gpgkey=file:///etc/pki/rpm-gpg/RPM-GPG-KEY-centosofficial
[AppStream]
name=AppStream
baseurl=https://mirrors.aliyun.com/centos/$releasever/AppStream/$basearch/os/
https://mirrors.huaweicloud.com/centos/$releasever/AppStream/$basearch/os/
https://mirrors.cloud.tencent.com/centos/$releasever/AppStream/$basearch/os/
https://mirrors.tuna.tsinghua.edu.cn/centos/$releasever/AppStream/$basearch/os/
http://mirrors.163.com/centos/$releasever/AppStream/$basearch/os/
http://mirrors.sohu.com/centos/$releasever/AppStream/$basearch/os/
gpgcheck=1
gpgkey=file:///etc/pki/rpm-gpg/RPM-GPG-KEY-centosofficial
[EPEL]
name=EPEL
baseurl=https://mirrors.aliyun.com/epel/$releasever/Everything/$basearch/
https://mirrors.huaweicloud.com/epel/$releasever/Everything/$basearch/
https://mirrors.cloud.tencent.com/epel/$releasever/Everything/$basearch/
https://mirrors.tuna.tsinghua.edu.cn/epel/$releasever/Everything/$basearch/
gpgcheck=1
gpgkey=https://mirrors.aliyun.com/epel/RPM-GPG-KEY-EPEL-$releasever
[extras]
name=extras
baseurl=https://mirrors.aliyun.com/centos/$releasever/extras/$basearch/os/
https://mirrors.huaweicloud.com/centos/$releasever/extras/$basearch/os/
https://mirrors.cloud.tencent.com/centos/$releasever/extras/$basearch/os/
https://mirrors.tuna.tsinghua.edu.cn/centos/$releasever/extras/$basearch/os/
http://mirrors.163.com/centos/$releasever/extras/$basearch/os/
http://mirrors.sohu.com/centos/$releasever/extras/$basearch/os/
gpgcheck=1
gpgkey=file:///etc/pki/rpm-gpg/RPM-GPG-KEY-centosofficial
enabled=1
[centosplus]
name=centosplus
baseurl=https://mirrors.aliyun.com/centos/$releasever/centosplus/$basearch/os/
https://mirrors.huaweicloud.com/centos/$releasever/centosplus/$basearch/os/
https://mirrors.cloud.tencent.com/centos/$releasever/centosplus/$basearch/os/
https://mirrors.tuna.tsinghua.edu.cn/centos/$releasever/centosplus/$basearch/os/
http://mirrors.163.com/centos/$releasever/centosplus/$basearch/os/
http://mirrors.sohu.com/centos/$releasever/centosplus/$basearch/os/
gpgcheck=1
gpgkey=file:///etc/pki/rpm-gpg/RPM-GPG-KEY-centosofficial1.7.ubuntu软件包管理dpkg和apt
清华大学镜像官网: https://mirrors.tuna.tsinghua.edu.cn/help/ubuntu/
阿里云镜像官网:https://developer.aliyun.com/mirror/ubuntu
1.7.1.Ubuntu 软件仓库
vim /etc/apt/sources.list# 默认注释了源码镜像以提高 apt update 速度,如有需要可自行取消注释
deb https://mirrors.tuna.tsinghua.edu.cn/ubuntu/ focal main restricted universe multiverse
# deb-src https://mirrors.tuna.tsinghua.edu.cn/ubuntu/ focal main restricted universe multiverse
deb https://mirrors.tuna.tsinghua.edu.cn/ubuntu/ focal-updates main restricted universe multiverse
# deb-src https://mirrors.tuna.tsinghua.edu.cn/ubuntu/ focal-updates main restricted universe multiverse
deb https://mirrors.tuna.tsinghua.edu.cn/ubuntu/ focal-backports main restricted universe multiverse
# deb-src https://mirrors.tuna.tsinghua.edu.cn/ubuntu/ focal-backports main restricted universe multiverse
# 以下安全更新软件源包含了官方源与镜像站配置,如有需要可自行修改注释切换
deb https://mirrors.tuna.tsinghua.edu.cn/ubuntu/ focal-security main restricted universe multiverse
# deb-src https://mirrors.tuna.tsinghua.edu.cn/ubuntu/ focal-security main restricted universe multiverse
# 预发布软件源,不建议启用
# deb https://mirrors.tuna.tsinghua.edu.cn/ubuntu/ focal-proposed main restricted universe multiverse
# # deb-src https://mirrors.tuna.tsinghua.edu.cn/ubuntu/ focal-proposed main restricted universe multiverse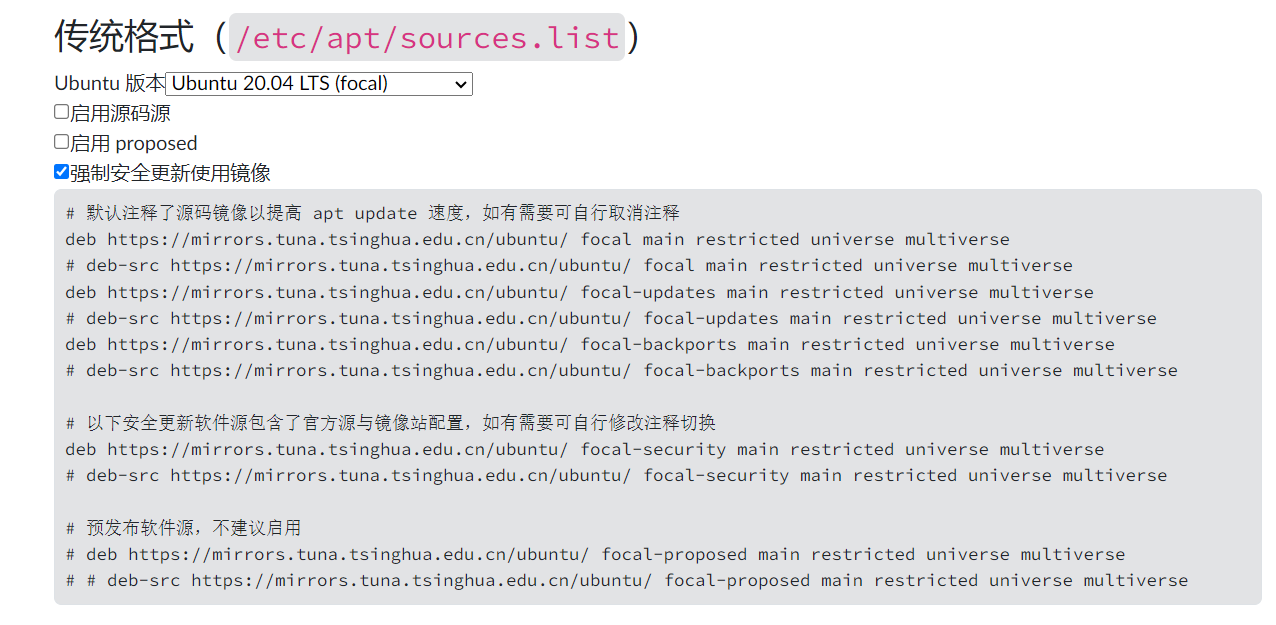
1.8. 最小化安装常用软件:
1.9. 网卡NAT设置--eth0
1.10. 时间同步
#按计划时间同步
crontab -l
#1. sync time
*/2 * * * * /sbin/ntpdate ntp1.aliyun.com &>/dev/null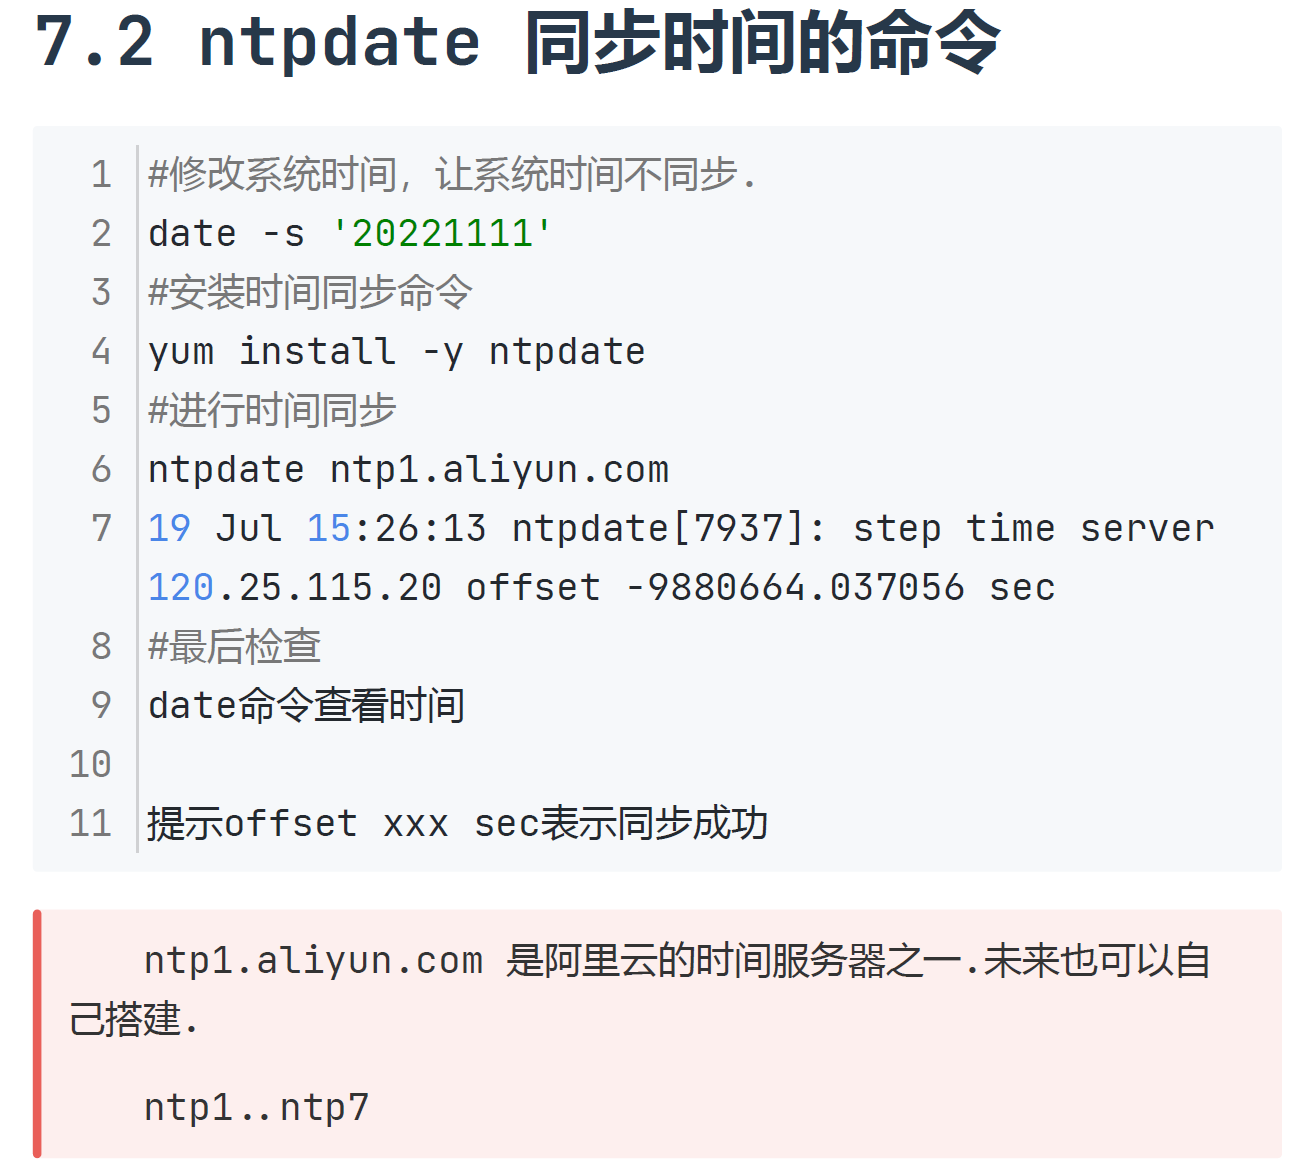
1.10.1.通用修改时间
#设置时区
timedatectl set-timezone Asia/Shanghai
#配置时间同步
vi /etc/chrony.conf
server ntp.aliyun.com iburst
server ntp1.aliyun.com iburst
server ntp2.aliyun.com iburst
#allow 192.168.0.0/16
allow 0.0.0.0/0 #加此行,指定允许同步的网段
# Serve time even if not synchronized to a time source.
local stratum 10 #删除此行注释,当互联网无法连接,仍然可以为客户端提供时间同步服务

systemctl restart chronyd
#启用Chrony服务
#运行以下命令启动chronyd服务并设置开机自启动。
systemctl start chronyd.service
systemctl enable chronyd.service
#运行以下命令查看本机时间同步状态,用于验证服务是否已启动
chronyc tracking
#运行以下命令查看时间同步服务器列表。
chronyc -n sources -v
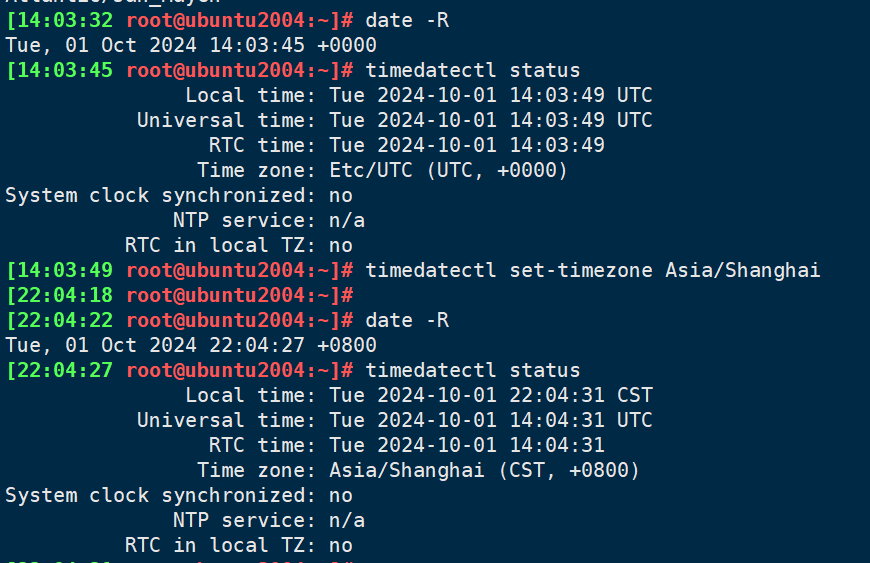
1.10.2.ubuntu2004修改时区
1.10.3.CentOS6更新系统时间
# 设置时区
cp /usr/share/zoneinfo/Asia/Shanghai /etc/localtime
# 安装ntpdate
yum -y install ntpdate
# 联网更新时间,如果成功,将系统时间写入BOIS
ntpdate time.windows.com && hwclock -w


1.11.Linux彩色命令提示符prompt
1.11.1.Rocky8
1.11.1.1.ROOT用户
[root@example ~]# echo $PS1
[\u@\h \W]\$
PS1='\[\e[1;32m\][\t \[\e[1;33m\]\u\[\e[35m\]@\h\[\e[1;31m\] \W\[\e[1;32m\]]\[\e[0m\]\$ '
PS1='\[\e[1;32m\[[\[\e[1;33m\]\u\[\e[35m\]@\h\[\e[1;31m\] \W\[\e[1;32m\]]\[\e[0m\]\$ '
PS1='\e[31;1m[\u@\h \W]\$ \e[0m'
# 如果是永久保存,则要写入文件
echo "PS1='\[\e[1;32m\][\t \[\e[1;33m\]\u\[\e[35m\]@\h\[\e[1;31m\] \W\[\e[1;32m\]]\[\e[0m\]\$ '" > /etc/profile.d/env.sh
echo "PS1='\e[31;1m[\u@\h \W]\$ \e[0m'" > /etc/profile.d/env.sh
source /etc/profile.d/env.sh

1.11.1.2.普通用户
PS1='\[\e[1;32m\][\t \[\e[1;33m\]\u\[\e[35m\]@\h\[\e[1;31m\] \W\[\e[1;32m\]]\[\e[0m\]\\$ '
PS1='\[[\[\e[1;33m\]\u\[\e[35m\]@\h\[\e[1;31m\] \W\[\e[1;32m\]]\[\e[0m\]\\$ '

PS1='\[\e[1;32m\][\t\e[31;1m \u@\h \W]\\$ \e[0m'
PS1='\e[31;1m[\u@\h \W]\\$ \e[0m'
# 如果是永久保存,则要写入文件
echo "PS1='\[\e[1;32m\][\t \[\e[1;33m\]\u\[\e[35m\]@\h\[\e[1;31m\] \W\[\e[1;32m\]]\[\e[0m\]\\$ '" > /etc/profile.d/env.sh
echo "PS1='\[[\[\e[1;33m\]\u\[\e[35m\]@\h\[\e[1;31m\] \W\[\e[1;32m\]]\[\e[0m\]\\$ '" > /etc/profile.d/env.sh
echo "PS1='\[\e[1;32m\][\t\e[31;1m \u@\h \W]\\$ \e[0m'" > /etc/profile.d/env.sh
echo "PS1='\e[31;1m[\u@\h \W]\\$ \e[0m'" > /etc/profile.d/env.sh
source /etc/profile.d/env.sh


1.11.2.ubuntu2004
[13:49:10 dange@ubuntu2004 ~]$ echo $PS1
\[\e[1;32m\][\t \e[1;35m\]\u@\h \W]\\$\[\e[0m\]
[13:49:15 dange@ubuntu2004 ~]$
[13:49:21 dange@ubuntu2004 ~]$ su - root
Password:
[13:49:27 root@ubuntu2004:~]# echo $PS1
\[\e[1;32m\][\t \e[1;31m\u@\h:\w]\$\e[0m
1.11.2.1.ROOT用户


root
PS1='\e[1;31m[\u@\h:\W]\$\e[0m '
PS1='\[\e[1;32m\][\t \e[1;31m\u@\h:\W]\$\e[0m '
echo "PS1='\e[1;31m[\u@\h:\W]\$\e[0m '" >> .bashrc
echo "PS1='\[\e[1;32m\][\t \e[1;31m\u@\h:\W]\$\e[0m '" >> .bashrc
source .bashrc
1.11.2.2.普通用户


普通
PS1='\[\e[1;35m\][\u@\h \W]\\$\[\e[0m\] '
PS1='\[\e[1;32m\][\t \e[1;35m\]\u@\h \W]\\$\[\e[0m\] '
普通
echo "PS1='\[\e[1;35m\][\u@\h \W]\\$\[\e[0m\] '" >> .bashrc
echo "PS1='\[\e[1;32m\][\t \e[1;35m\]\u@\h \W]\\$\[\e[0m\] '" >> .bashrc
source .bashrc
1.12.xshell7 vim后文件内容仍停留在屏幕的问题
[18:12:34 root@host-200-king /]#echo $TERM
linux

输出的是linux 如果不想让文件显示在屏幕上面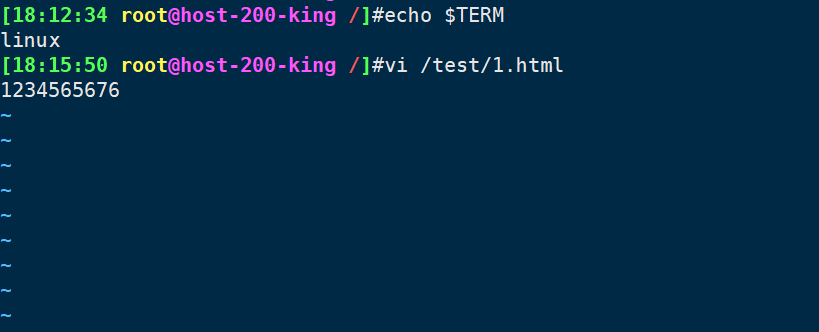
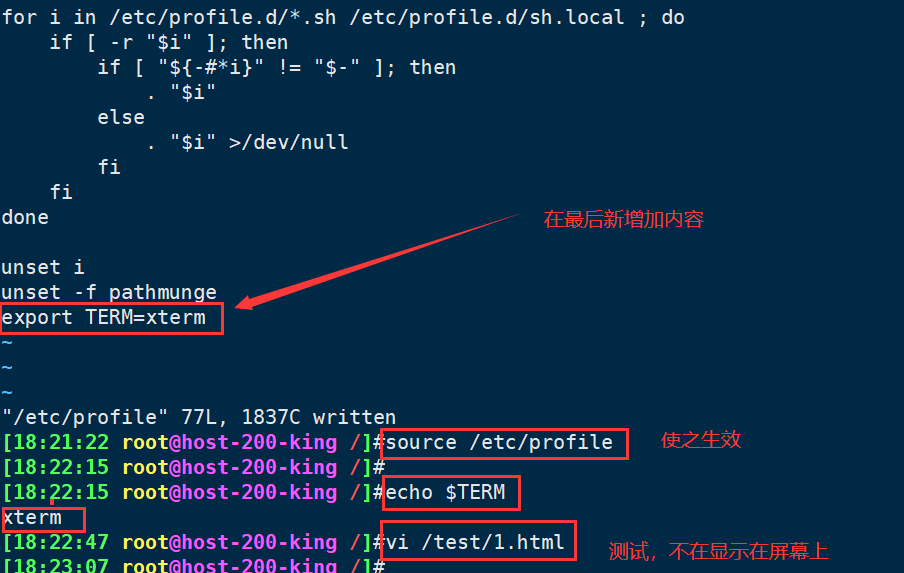
解决办法:
vim /etc/profile
# 查看 /etc/profile 中的 export TERM=xterm
# 在左后一行加上 export TERM=xterm
source /etc/profile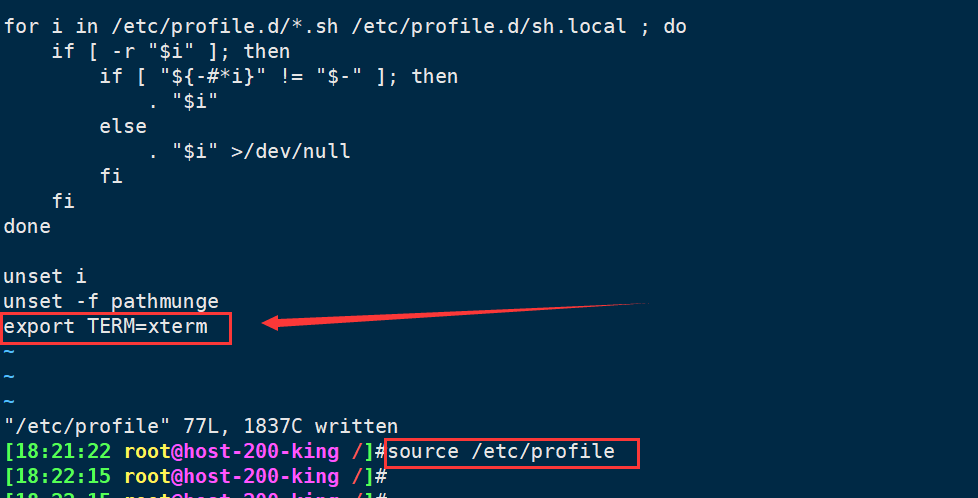
1.13.设置主机名
hostnamectl set-hostname Rocky9.2# centos6
sed -Ei.bak '/^(HOSTNAME=)/s#^(HOSTNAME=).*#\1centos6#' /etc/sysconfig/network1.14.设置root用户并远程登录【ubuntu】
使用apt安装openssh服务。

apt-get install openssh-server
想让root恢复成初始时候一样:
没有密码;
切换root账号输入密码错误;
使用下面的命令:
#删除root账号密码
sudo passwd -d root
#锁定root账号
sudo passwd -l root
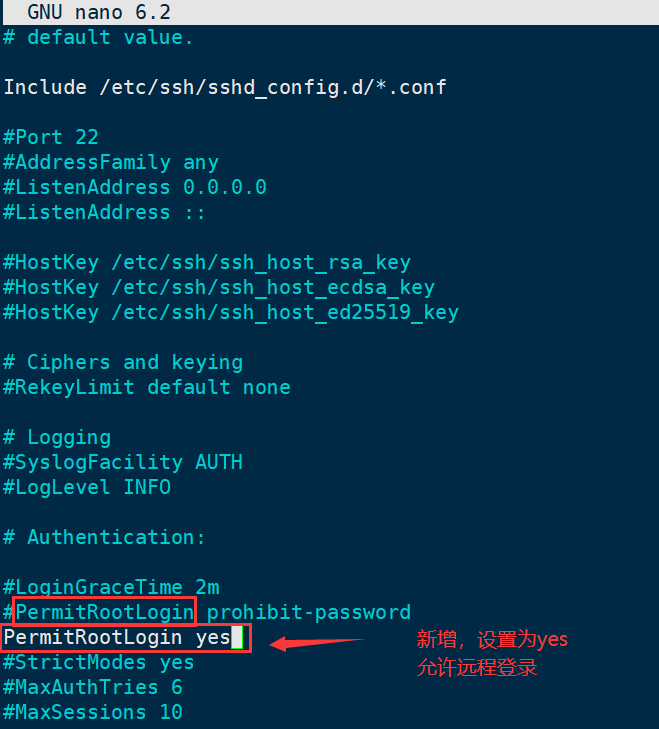
systemctl restart sshd.service

sudo /etc/init.d/ssh restart
1.15.添加额外网卡
第1块网卡 nat模式 : eth0 10.0.0.7 模拟公网
第2块网卡 : eth1 172.16.1.7 局域网

eth1: lan区段网卡(添加1次所有虚拟机都可以识别与使用)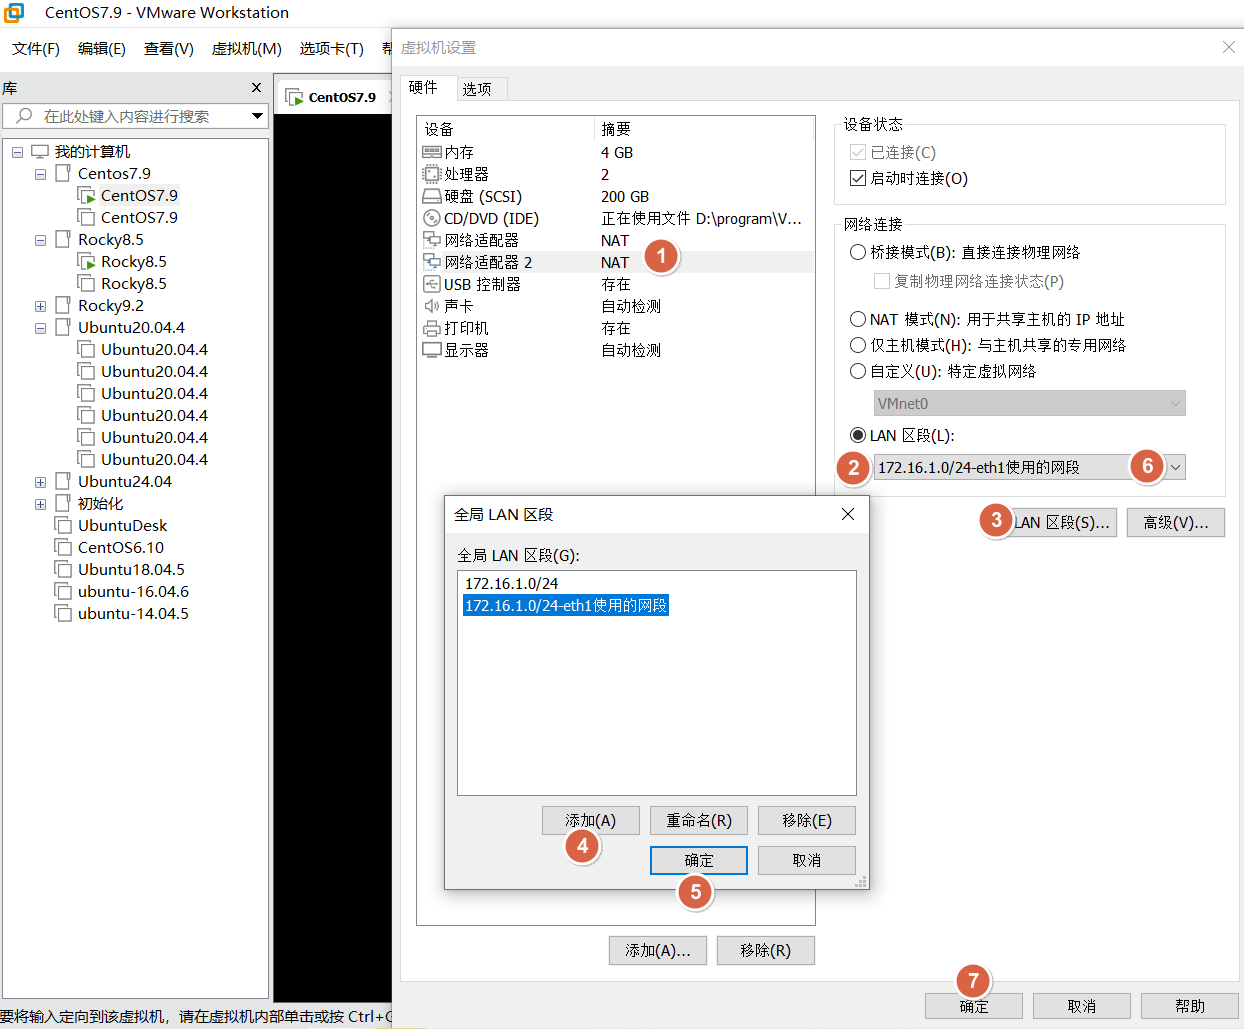
- 添加eth1网卡配置文件
[root@localhost network-scripts]# cat ifcfg-eth1
NAME=eth1
DEVICE=eth1
IPADDR=172.16.1.210
PREFIX=24
ONBOOT=yes
BOOTPROTO=static
#不需要网关
#不用配置DNS

systemctl restart network #重启网卡生效
1.16.优化ssh连接速度
sshd服务问题.
sed -i '/^GSSAPIAuthentication/s@^@#@g' /etc/ssh/sshd_config
cat >>/etc/ssh/sshd_config<<EOF
UseDNS no #相当于网络命令的-n选项.
GSSAPIAuthentication no #关闭GSS认证.
EOF

systemctl restart sshd

#检查
egrep '^(GSSAPIAuthentication|UseDNS)'  /etc/ssh/sshd_config
注: sshd_config后面讲解sshd服务会有详解,目前配置即可.
1.17.实现邮件通信:star::star::star::star::star:
# 告警消息脚本
[root@mha-manager ~]# cat /usr/local/bin/sendmail.sh
#!/bin/bash
echo "MHA is failover!" | mail -s "MHA Warning" XXXXX@qq.com &>/dev/null

[root@mha-manager ~]# chmod +x /usr/local/bin/sendmail.sh

# 安装邮件服务
[root@mha-manager ~]# yum install mailx postfix

# 邮件服务配置
[root@mha-manager ~]# vim /etc/mail.rc
# 加在最下面
#发件箱
set from="xxxxxxxxx@qq.com"
# 配置的第三方smtp服务器的地址及端口
set smtp=smtp://smtp.qq.com:587
#发件人
set smtp-auth-user="xxxxxxxxx@qq.com"
#授权码
set smtp-auth-password=xxxxxxxxx
# 认证方式
set smtp-auth=login
#开启ssl
set ssl-verify=ignore
set smtp-use-starttls=yes
#证书目录,下方为centos系统证书默认位置,也自行生成证书并指定
set nss-config-dir=/etc/pki/nssdb


--说明
from:对方收到邮件时显示的发件人
smtp:指定第三方发邮件的smtp服务器地址,云服务器必须使用465端口默认25端口被禁用
set smtp-auth-user:第三方发邮件的用户名
set smtp-auth-password:  邮箱的授权码注意不是密码

#echo "测试邮件" | mail -s "发送成功" XXXXXXXXX@qq.com &>/dev/null

# 重新启动postfix
[root@mha-manager ~]# systemctl restart postfix.service

# 测试告警邮件
[root@mha-manager ~]# sendmail.sh
二、==Linux终端显示中文改成英文==
终端显示(改动前)
[10:13:41 root@host-200-king ~]#mkdir /a/a/a/a/a
mkdir: 无法创建目录"/a/a/a/a/a": 没有那个文件或目录
centos 7
[10:18:19 root@centos ~]#cat /etc/locale.conf
LANG="zh_CN.UTF-8"
centos 6
[10:18:19 root@centos ~]#cat /etc/sysconfig/i18n
LANG="zh_CN.UTF-8"
更改为
LANG="en_US.UTF-8"
# 需要重启
# reboot
终端显示(改动后)
[10:21:53 root@host-200-king ~]#mkdir a/a/a/a/a/a
mkdir: cannot create directory ‘a/a/a/a/a/a’: No such file or directory
[10:22:07 root@host ~]#cat /etc/locale.conf
#LANG="zh_CN.UTF-8"
LANG="en_US.UTF-8"三、==安装Linux常用工具==
3.1.生产实践:基于最小化安装的系统建议安装下面相关包
# 自动挂载光盘
yum -y install autofs
systemctl enable --now autofs
# 访问
lsblk
ls /misc/cd
# 在安装或升级软件包之前,建议先执行apt update命令,以确保获取到最新的软件包信息
apt update
# 最小化安装常用工具
yum -y tmux man-pages strace
# 安装Linux常用工具
yum -y install tree vim wget lrzsz psmisc wget tcpdump ftp rsync lsof
yum -y install net-tools sysstat iotop iftop htop zip unzip bzip2 nc nmap telnet bc
yum -y install psmisc httpd-tools bind-utils nethogs expect
# 终端复用器软件就是会话与窗口的“解绑”工具
yum -y install epel-release
yum -y install screen
# 命令补全
yum -y install bash-completion
# 安装linux娱乐工具
yum install -y sl cowsay3.2.centos
yum -y install gcc make gcc-c++ glibc glibc-devel pcre pcre-devel openssl openssl-devel systemd-devel zlib-devel nfs-utilsyum -y install tmux man-pages strace tree vim wget lrzsz psmisc wget tcpdump ftp rsync lsof net-tools sysstat iotop iftop htop zip unzip bzip2 nc nmap telnet bc psmisc httpd-tools bind-utils nethogs expect epel-release screen bash-completion sl cowsay3.3.ubuntu
apt -y install tmux strace tree vim wget lrzsz psmisc wget tcpdump ftp rsync lsof net-tools sysstat iotop iftop htop zip unzip bzip2 nmap telnet bc psmisc nethogs expect ntpdate screen bash-completion sl cowsay # ubuntu 16.04
apt -y install tmux strace vim wget psmisc wget tcpdump ftp rsync lsof net-tools bzip2 telnet psmisc screen bash-completion运行 tree 命令,运行 sl 命令| 命令 | 作用 |
|---|---|
| tree | 以树形显示目录结构 |
| psmisc | pstree 等命令 |
| vim | vi升级版 |
| wget | 下载工具 |
| ==bash-completion(默认源)== | ==自动补全增强工具,可以补全命令参数== |
| ==bash-completion-extras(epel)== | ==自动补全超级增强工具,可以补全命令参数== |
| lrzsz | 上传下载工具 rz和sz |
| net-tools | ifconfig route命令属于的软件包 |
| sysstat | sar iostat 属于的软件包 |
| iotop | 查询系统每个进程的io读写情况 swap写入情况 |
| iftop | 查询网络流量情况 |
| nethogs | 显示每个进程的流量情况 |
| htop | top升级版 |
| unzip | 解压 |
| nc | ncat 类似telnet |
| nmap | 网络扫描工具 |
| telnet | 检查端口是否开启 |
| bc | 基础计算器 |
| lsof | 显示所有被打开的文件 |
| dig | DNS解析 bind-utils软件包 |
| nslookup | DNS解析 bind-utils软件包 |
| host | DNS解析 bind-utils软件包 |
| htpasswd | 创建密码文件 存放用户名和加密的密码 一般用于 nginx 简单认证中 |
| mkpasswd | 生成随机密码 属于expect软件包 |
3.4.装机必备软件【装机必备软件】
sysstat iotop pcp-system-tools net-tools freerdp tcpdump telnet nmap mtr nmap-ncat lsof xfsdump strace boom-boot smartmontools yum-utils tmux psmisc rsync rsyslog sos strace perf valgrind bcc-tools# 系统监控和诊断工具
sysstat iotop pcp-system-tools
# 网络
net-tools freerdp tcpdump telnet nmap mtr nmap-ncat
# 文件系统与磁盘
lsof xfsdump strace boom-boot smartmontools
# 系统管理
yum-utils tmux psmisc rsync
# 日志
rsyslog sos
# 调试和分析
strace perf valgrind bcc-tools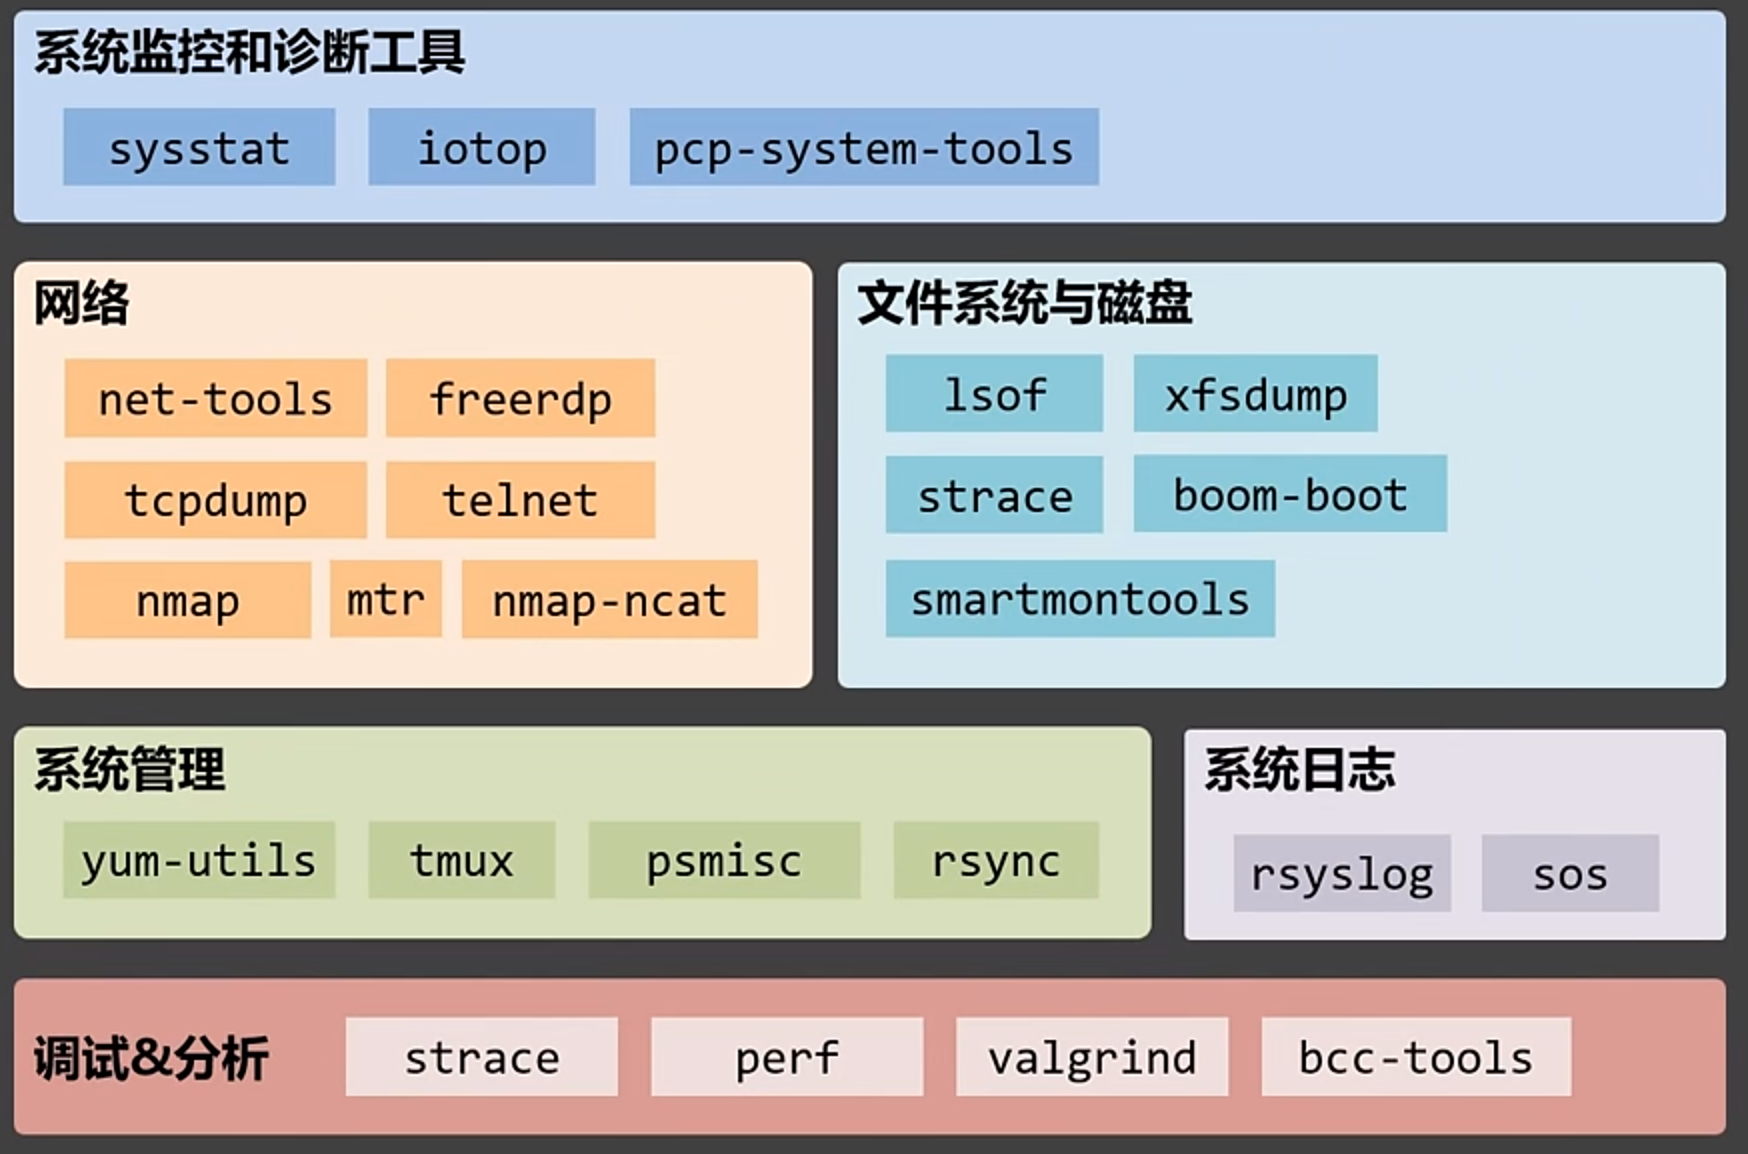
四、==修改网卡名称为eth0==
# 获取网卡文件名
ip addr | sed -En '/^2/s#^.* ([a-z]+[0-9]+).*#\1#p'
地址:10.0.0.X/24 GATEWAY:10.0.0.2,dns:10.0.0.2,180.76.76.76
名称修改:ethX- :one: IP
- :two: netmask
- :three: gateway 路由表
[root@rocky86 ~]# ll /etc/sysconfig/network-scripts/
total 4
-rw-r--r-- 1 root root 244 Aug 10 14:57 ifcfg-eth0

[root@rocky86 ~]# cat /etc/sysconfig/network-scripts/ifcfg-eth0
TYPE=Ethernet
PROXY_METHOD=none
BROWSER_ONLY=no
BOOTPROTO=dhcp
DEFROUTE=yes
IPV4_FAILURE_FATAL=no
IPV6INIT=yes
IPV6_AUTOCONF=yes
IPV6_DEFROUTE=yes
IPV6_FAILURE_FATAL=no
NAME=eth0
UUID=b984cc1e-e109-4d5d-8c62-77714323de08
DEVICE=eth0
ONBOOT=yes- 常用配置项
| 配置项 | 变量名 | 备注 | |
|---|---|---|---|
| 设备名 | ==DEVICE== | 指定网卡设备名称 | |
| 连接名 | ==NAME== | 命令行下显示的配置名称 | |
| IP地址 | ==IPADDR== | IPV4的IP地址,多个地址可以写成 IPADDR2,IPADDR3 | |
| 子网掩码 | NETMASK | 传统写法 NETMASK=255.255.255.0 | |
| 子网掩码 | ==PREFIX== | 新写法 PREFIX=24,多地址可以写成 PREFIX2,PREFIX3 | |
| 网关 | ==GATEWAY== | 提供跨网段通讯功能 | |
| IP地址类型 | ==BOOTPROTO== | 获取IP方式,==dhcp 动态获取,none\ | static 静态地址== |
| 网卡设备是否开机启用 | ==ONBOOT== | 是否开机启用,==yes== 启用,no 禁用 | |
| 域后缀 | DOMAIN | 域后缀 | |
| 主DNS | DNS1 | 主DNS | |
| 次DNS | DNS2 | 次DNS | |
| 第三DNS | DNS3 | 第三DNS |
没有子网掩码就搞不清在哪个网段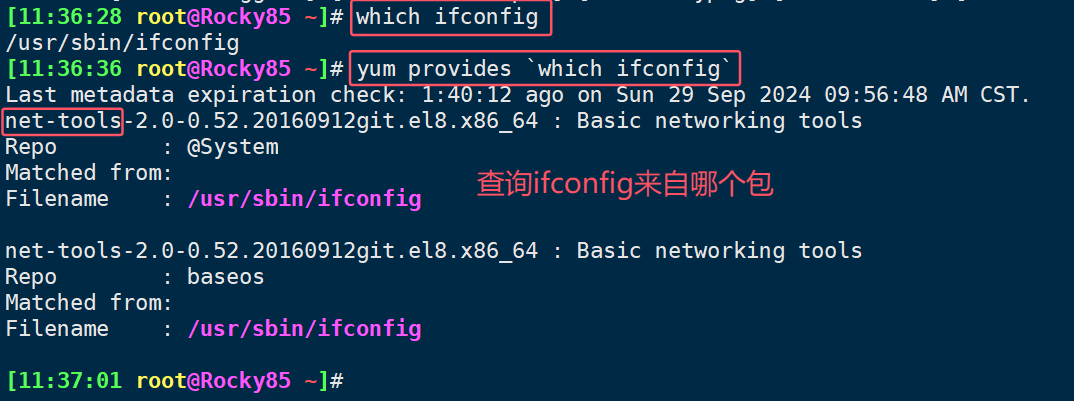

4.1.rocky8、rhel8 网卡设置
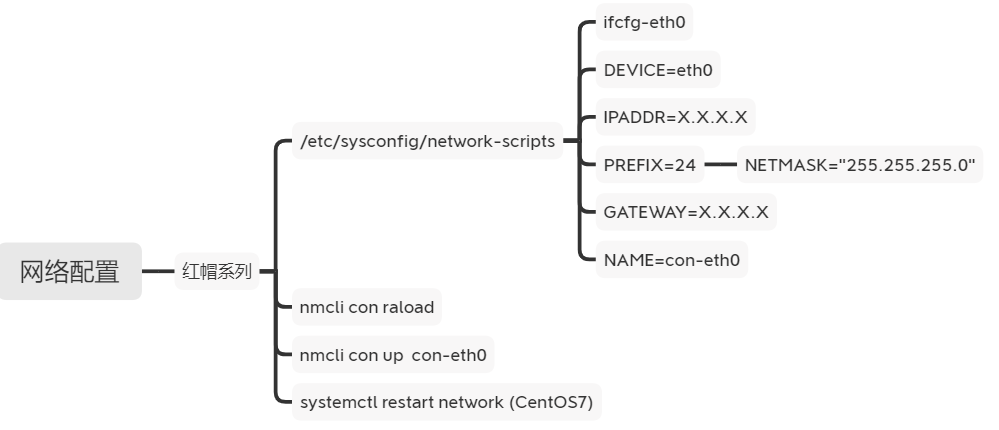
4.1.1.设置ip地址
10.0.0.8/24 10.0.0.24.1.2.设置eth0步骤
# 调整网卡名称
mv /etc/sysconfig/network-scripts/ifcfg-ens160 /etc/sysconfig/network-scripts/ifcfg-eth0

# 修改网卡的配置信息
vim /etc/sysconfig/network-scripts/ifcfg-eth0

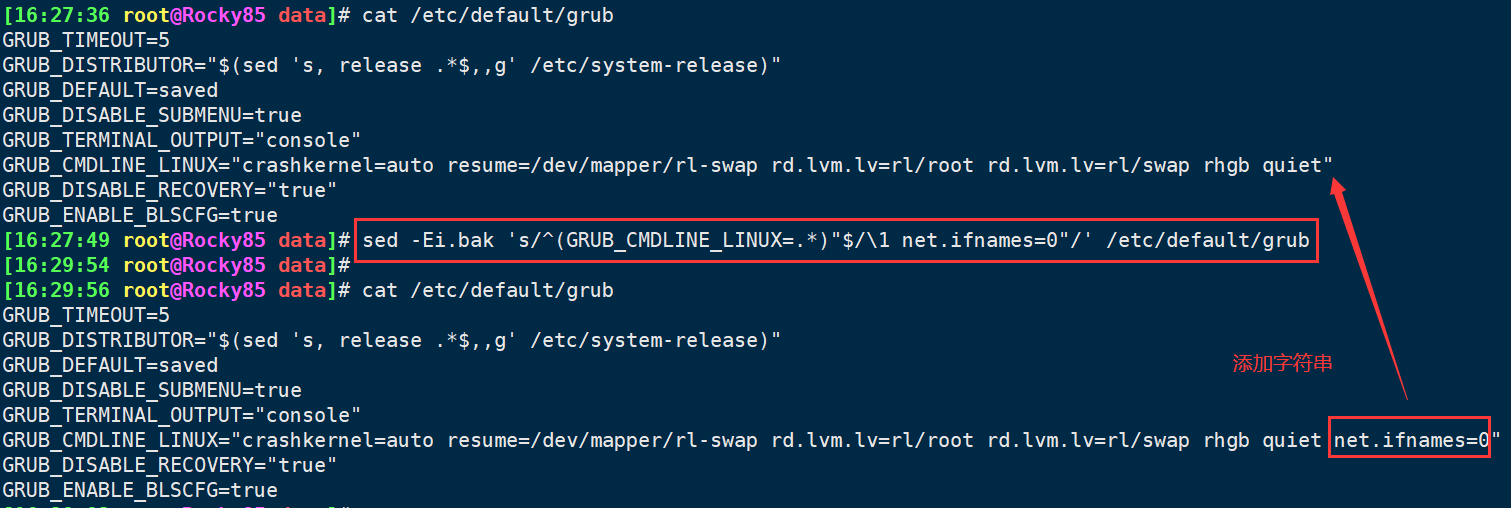
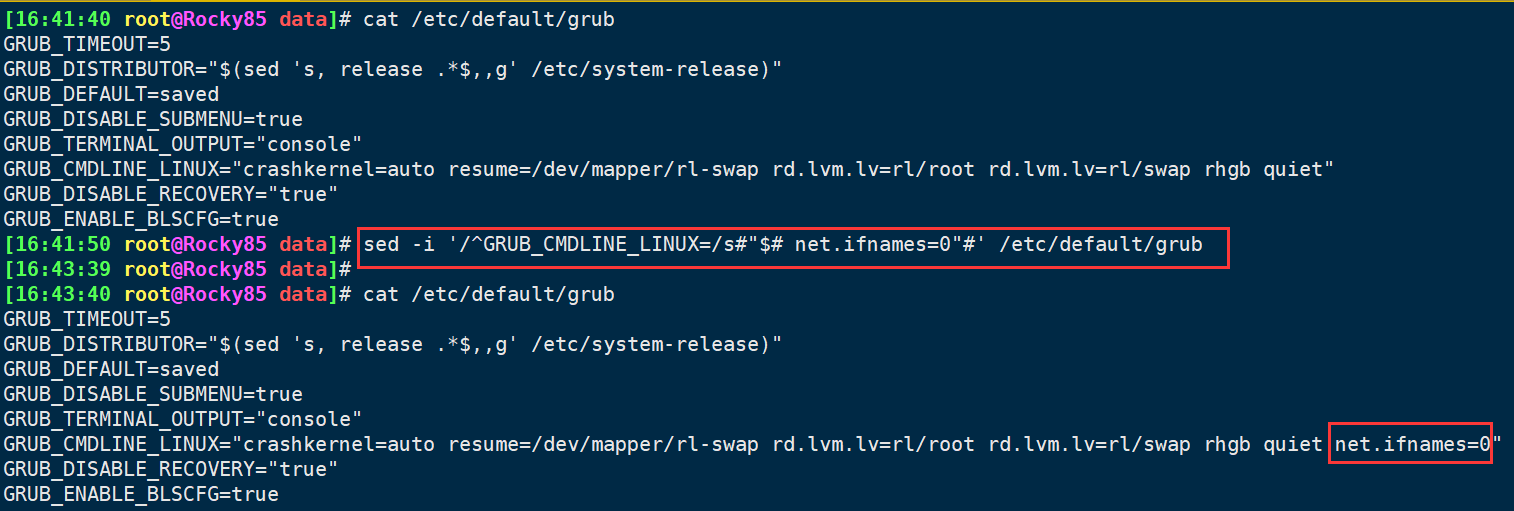
# 在GRUB_CMDLINE_LINUX 这一行末尾,添加内核参数
vim /etc/default/grub
net.ifnames=0 biosdevname=0

#sed -Ei.bak 's/^(GRUB_CMDLINE_LINUX=.*)"$/\1 net.ifnames=0 biosdevname=0"/' /etc/default/grub
sed -i.bak '/^GRUB_CMDLINE_LINUX=/s#"$# net.ifnames=0 biosdevname=0"#' /etc/default/grub

#  运行命令如下命令 来重新生成GRUB配置并更新内核参数,然后reboot系统
grub2-mkconfig -o /boot/grub2/grub.cfg
# 重启生效
reboot
4.1.3.设置静态ip
DEVICE=eth0
NAME=eth0
# IP 的配置方法[none|static|bootp|dhcp](引导时不使用协议|静态分配 IP|BOOTP 协议|DHCP 协议)
BOOTPROTO=static
IPADDR=10.0.0.156
# NETMASK="255.255.255.0"
PREFIX=24
GATEWAY=10.0.0.2
DNS1=10.0.0.2
DNS2=180.76.76.76
DNS3=119.29.29.29
ONBOOT=yes
4.1.4.重新启动加载网卡信息
nmcli connection
nmcli connection reload
nmcli connection up eth0
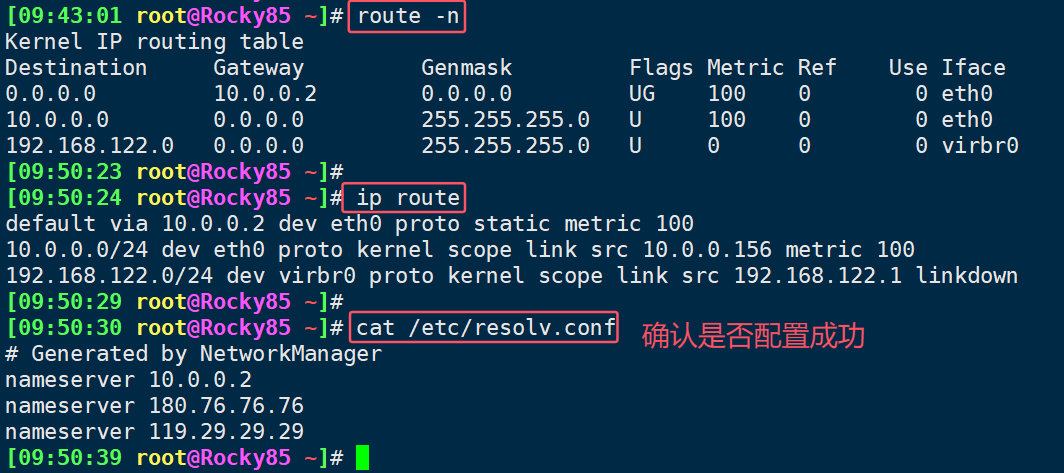
4.1.5.Rocky85系列
GRUB_TIMEOUT=5
GRUB_DISTRIBUTOR="$(sed 's, release .*$,,g' /etc/system-release)"
GRUB_DEFAULT=saved
GRUB_DISABLE_SUBMENU=true
GRUB_TERMINAL_OUTPUT="console"
GRUB_CMDLINE_LINUX="crashkernel=auto resume=/dev/mapper/rl-swap rd.lvm.lv=rl/root rd.lvm.lv=rl/swap rhgb quiet net.ifnames=0 biosdevname=0"
GRUB_DISABLE_RECOVERY="true"
GRUB_ENABLE_BLSCFG=true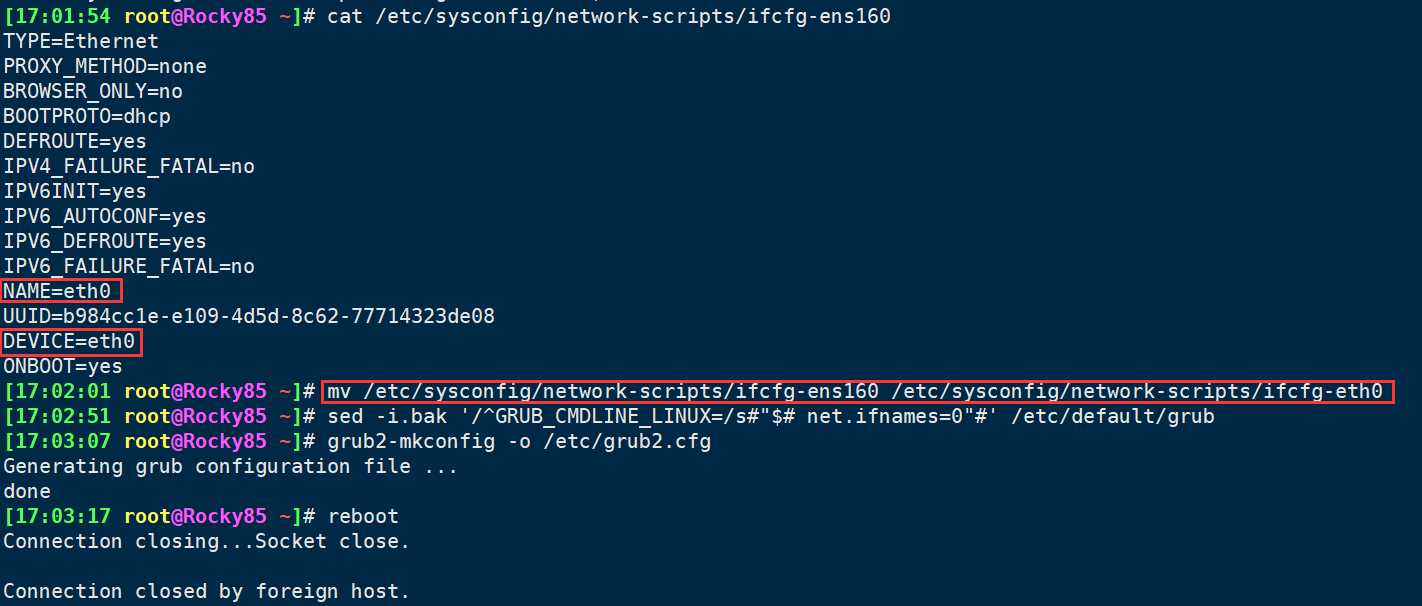



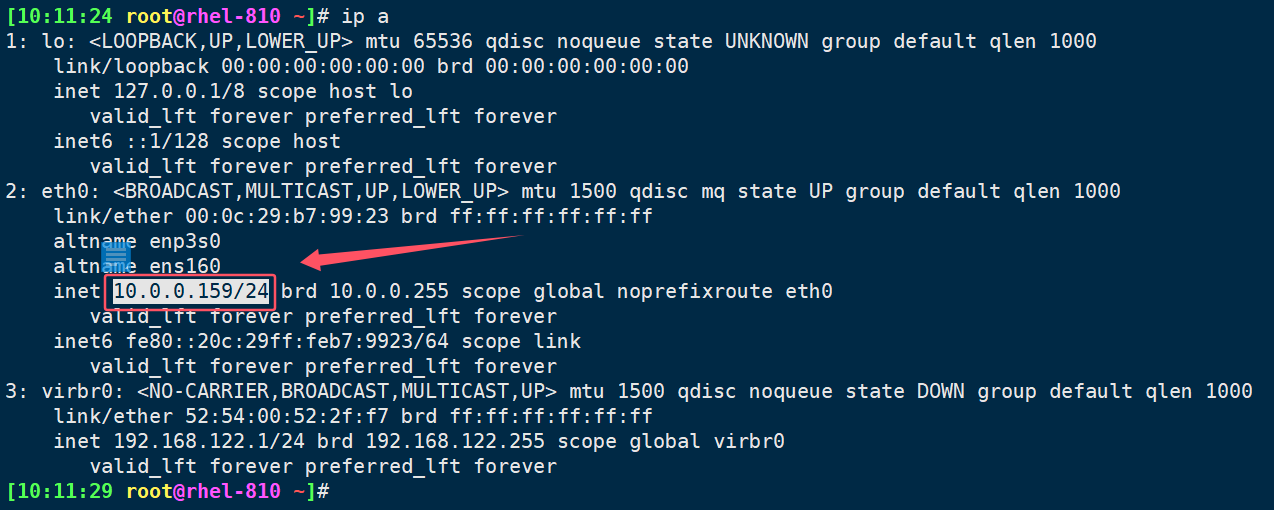
4.1.6.redhat红帽系列


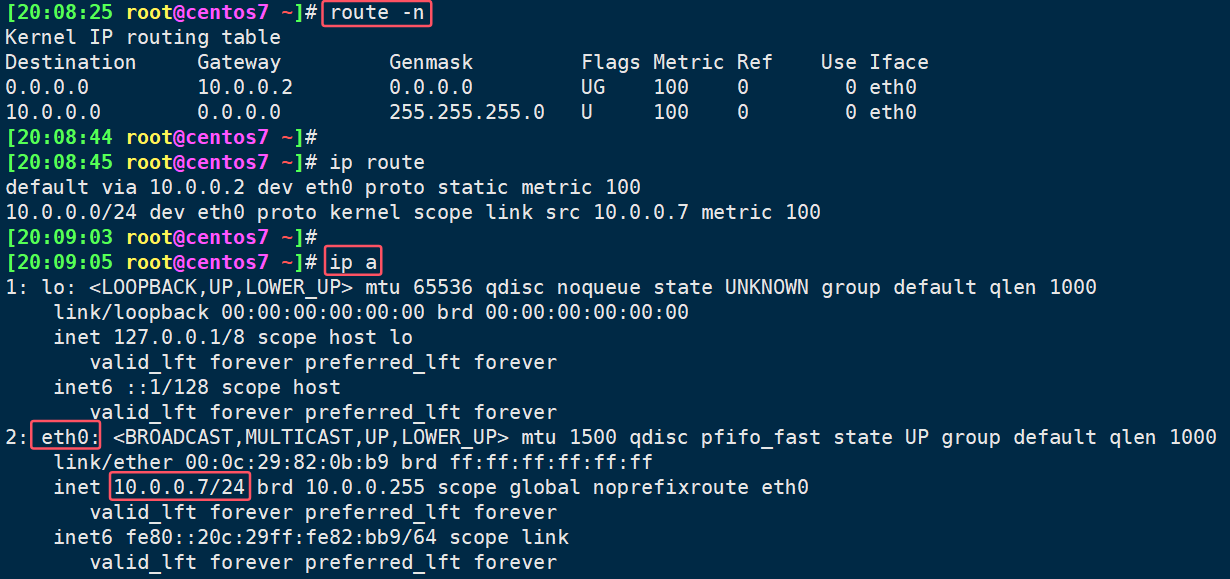
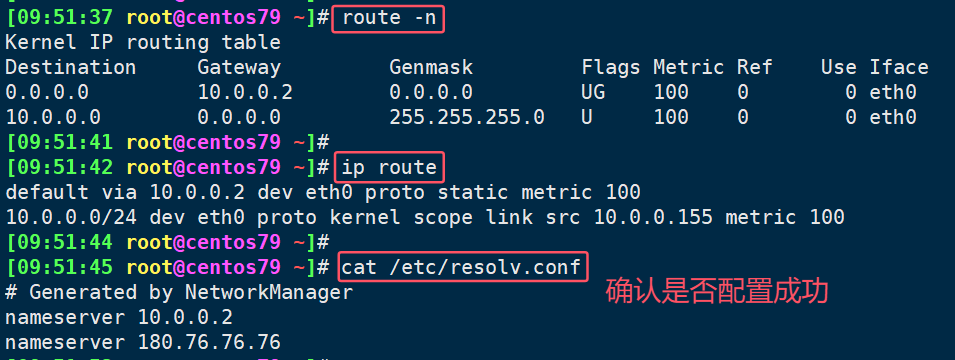
4.2.centos7网卡设置
4.2.1.调整网卡名称
mv /etc/sysconfig/network-scripts/ifcfg-ens33 /etc/sysconfig/network-scripts/ifcfg-eth04.2.2.调整网卡配置信息
vim /etc/sysconfig/network-scripts/ifcfg-eth0DEVICE=eth0
NAME=eth0
BOOTPROTO=static
IPADDR=10.0.0.7
PREFIX=24
GATEWAY=10.0.0.2
DNS1=10.0.0.2
DNS2=180.76.76.76
ONBOOT=yes# CentOS 7使用的是NetworkManager服务来管理网络配置
systemctl restart network
确认NetworkManager服务是否正在运行:systemctl status NetworkManager
如果NetworkManager正在运行,尝试停止该服务:systemctl stop NetworkManager
,然后重新启动网络服务:systemctl restart network
4.2.3.修改生成grub配置
vim /etc/sysconfig/grub

net.ifnames=0 biosdevname=0
4.2.4.生成grub启动菜单
grub2-mkconfig -o /boot/grub2/grub.cfg

reboot


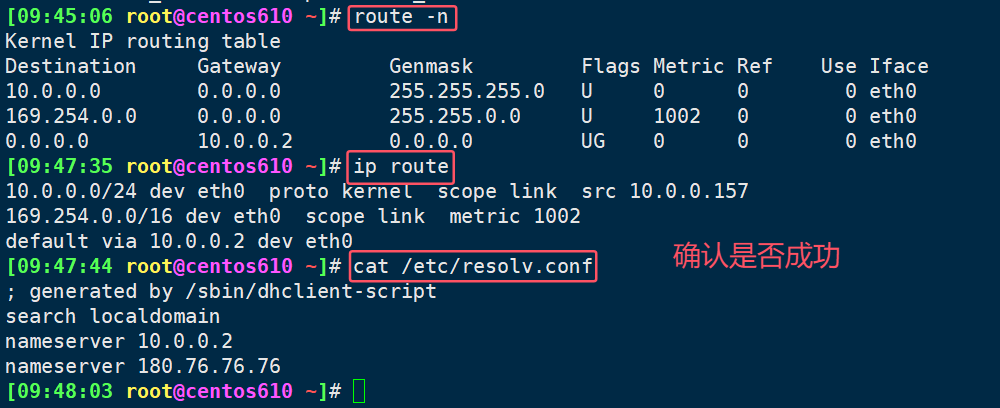
4.3.centos6网卡设置
vim /etc/sysconfig/network-scripts/ifcfg-eth0DEVICE=eth0
NAME=eth0
BOOTPROTO=static
IPADDR=10.0.0.157
PREFIX=24
GATEWAY=10.0.0.2
DNS1=10.0.0.2
DNS2=180.76.76.76
ONBOOT=yes# centos6
service network restart


4.4.centos6网卡设置【克隆机网卡报错】
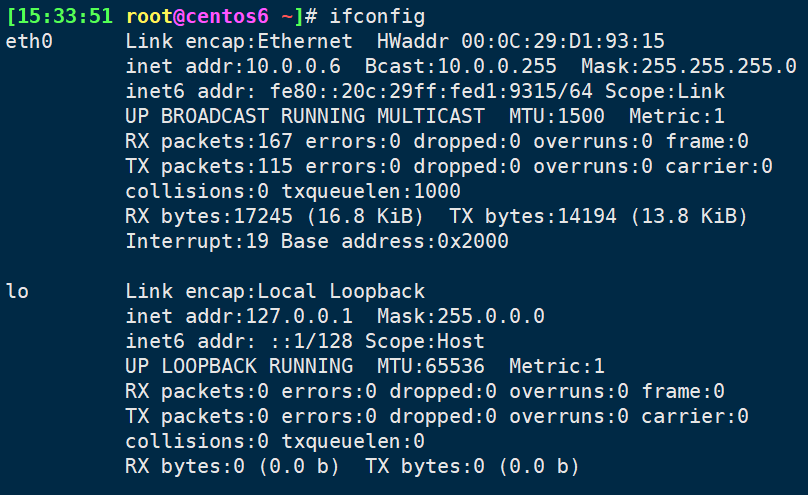
- 问题:重启网卡提示Bringing up interface eth0: Device eth0 does not seem to be present,delaying initialization.或者ifconfig无eth0.
- 原因:这是因为克隆的机器没有正确的mac,UUID信息冲突导致的。

- 方法:
- 1)首先将/etc/udev/rules.d/70-persistent-net.rules文件删除;
- 2)然后将网卡配置文件/etc/sysconfig/network-scripts/ifcfg-eth0的uuid和hwaddr这两行删除;
- 3)执行reboot命令,重启系统;
- 4)这时重启网卡就能正常重启了:/etc/init.d/network restart;
- 5)ifconfig查看ip信息。

4.5.rocky9网卡设置
vim /etc/default/grub
net.ifnames=0 biosdevname=0

# 为grub2生成其配置文件
grub2-mkconfig -o /etc/grub2.conf
#重启系统
reboot #网卡名就更改了
# 将网卡配置文件先备份一下
cd /etc/NetworkManager/system-connections
mv ens160.nmconnection eth0.nmconnection[14:13:24 root@Rocky92 system-connections]# cat eth0.nmconnection
[connection]
id=eth0
uuid=95556cb9-5f0e-333f-a767-cfe755026399
type=ethernet
autoconnect-priority=-999
interface-name=eth0
timestamp=1727873253
[ethernet]
[ipv4]
address1=10.0.0.9/24,10.0.0.2
dns=10.0.0.2;180.76.76.76;119.29.29.29
method=manual
[ipv6]
addr-gen-mode=eui64
method=auto
[proxy]


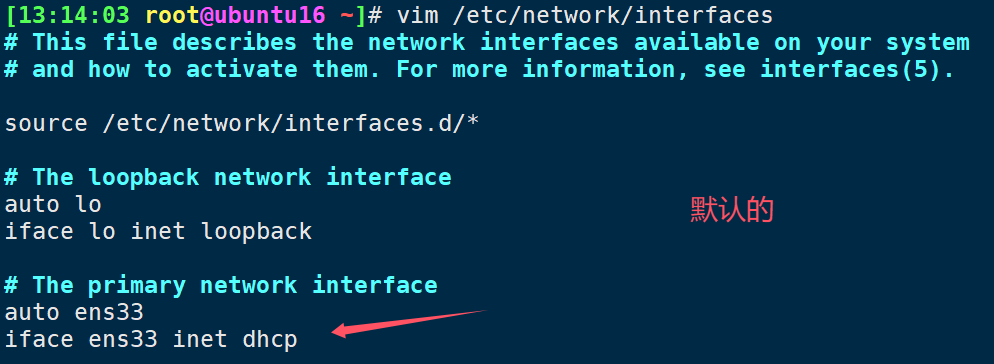
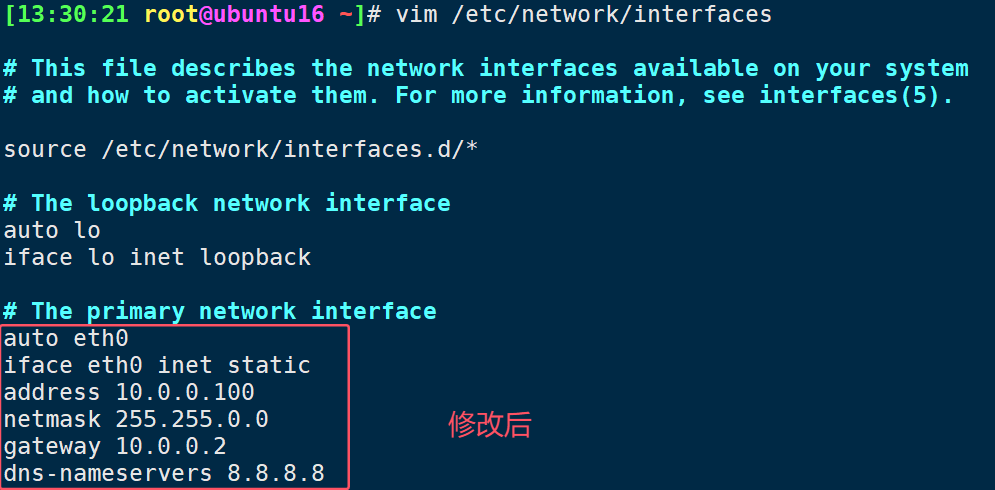
4.6.ubuntu1604网卡设置【不同】
# 注意:不同的linux系统,网卡配置文件是不同的,这里ubuntu的网卡配置文件是/etc/network/interfaces
vim /etc/network/interfaces
# The primary network interface
auto eth0
iface eth0 inet static
address 10.0.0.100
netmask 255.255.0.0
gateway 10.0.0.2
dns-nameservers 8.8.8.8 10.0.0.2 180.76.76.76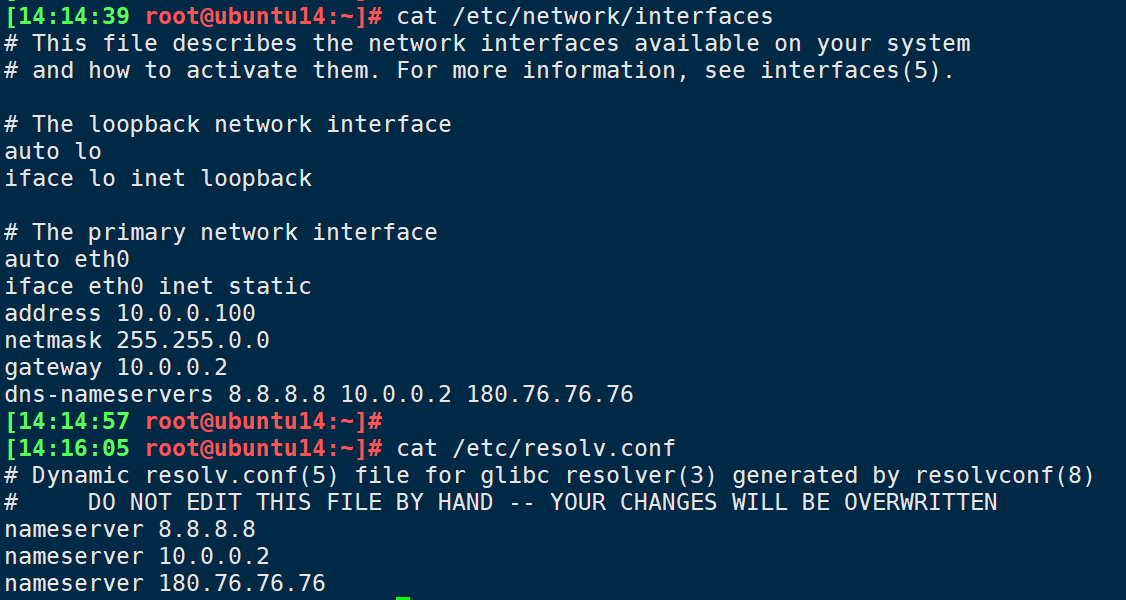


4.7.ubuntu2004网卡设置ens33修改为eth0【不同】
4.7.1.相关命令及配置
vim /etc/default/grub
net.ifnames=0

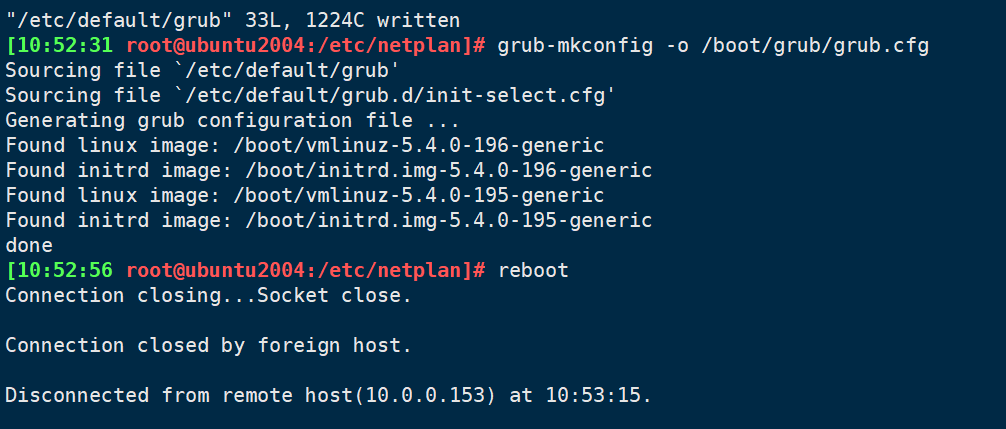
grub-mkconfig -o /boot/grub/grub.cfg
reboot # 更改网卡名
# 查看当前网络信息 ifconfig,将此处的ens33修改为eth0
# 编辑 vi /etc/default/grub
# 将字段GRUB_CMDLINE_LINUX=""
# 修改为GRUB_CMDLINE_LINUX="net.ifnames=0 biosdevname=0"
sed -Ei.bak 's/^(GRUB_CMDLINE_LINUX=".*)"$/\1net.ifnames=0 biosdevname=0"/' /etc/default/grub
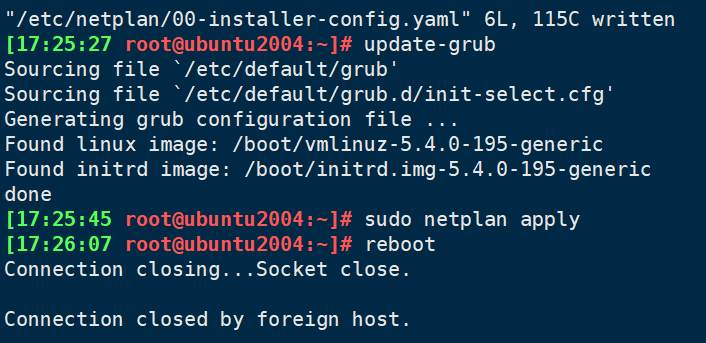
# 修改完更新
update-grub
# 修改网络配置,ens33修改为eth0
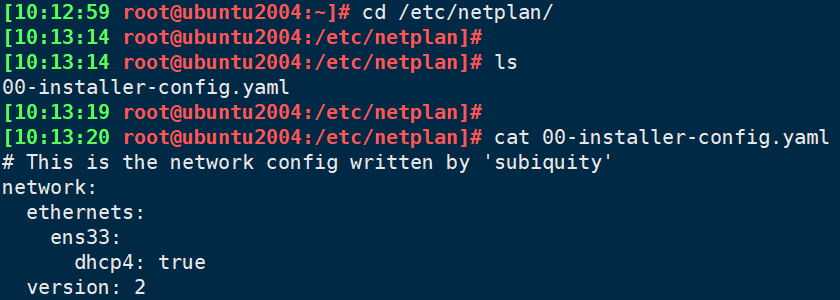
vim /etc/netplan/00-installer-config.yaml
#上述配置后执行指令
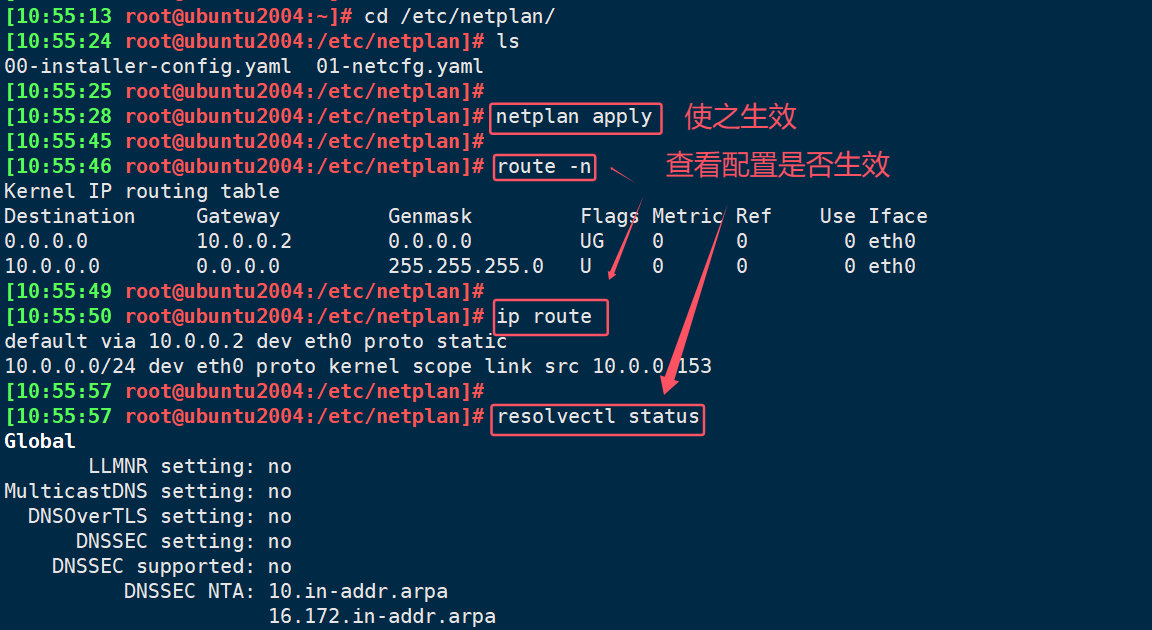
sudo netplan apply
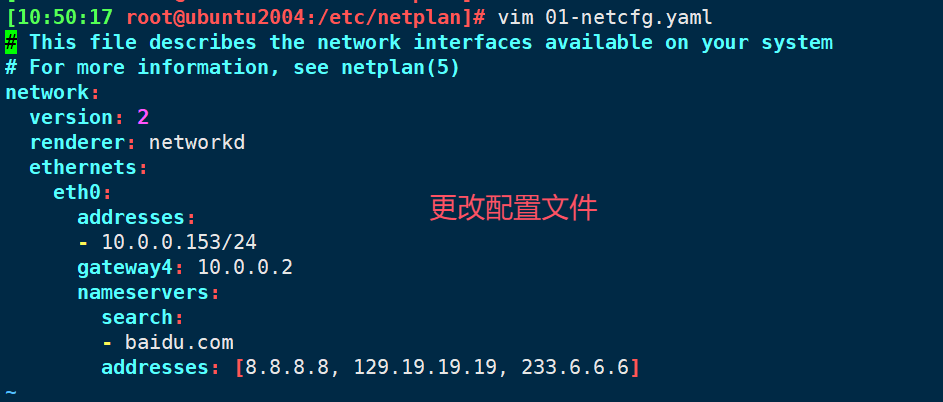
# 重启Ubuntu,ifconfig查看网卡是否更新[10:59:06 root@ubuntu2004:/etc/netplan]# cat 01-netcfg.yaml
# This file describes the network interfaces available on your system
# For more information, see netplan(5)
network:
version: 2
renderer: networkd
ethernets:
eth0:
addresses:
- 10.0.0.153/24
gateway4: 10.0.0.2
nameservers:
search:
- baidu.com
addresses: [8.8.8.8, 129.19.19.19, 233.6.6.6]4.7.2.配置步骤
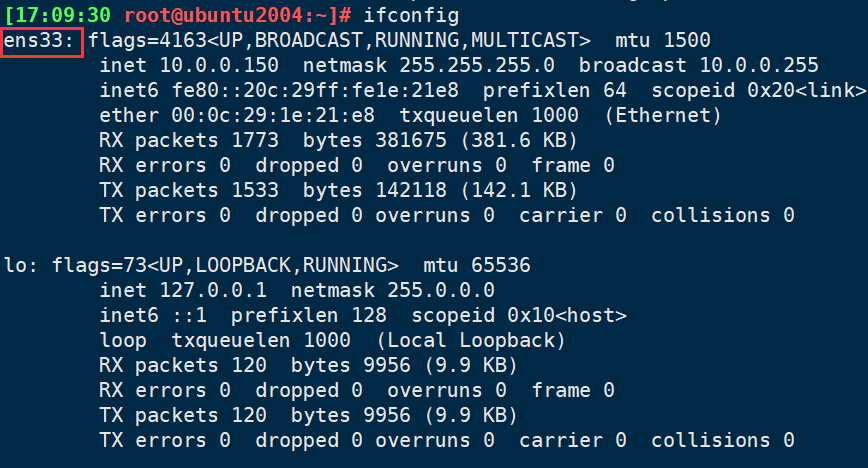

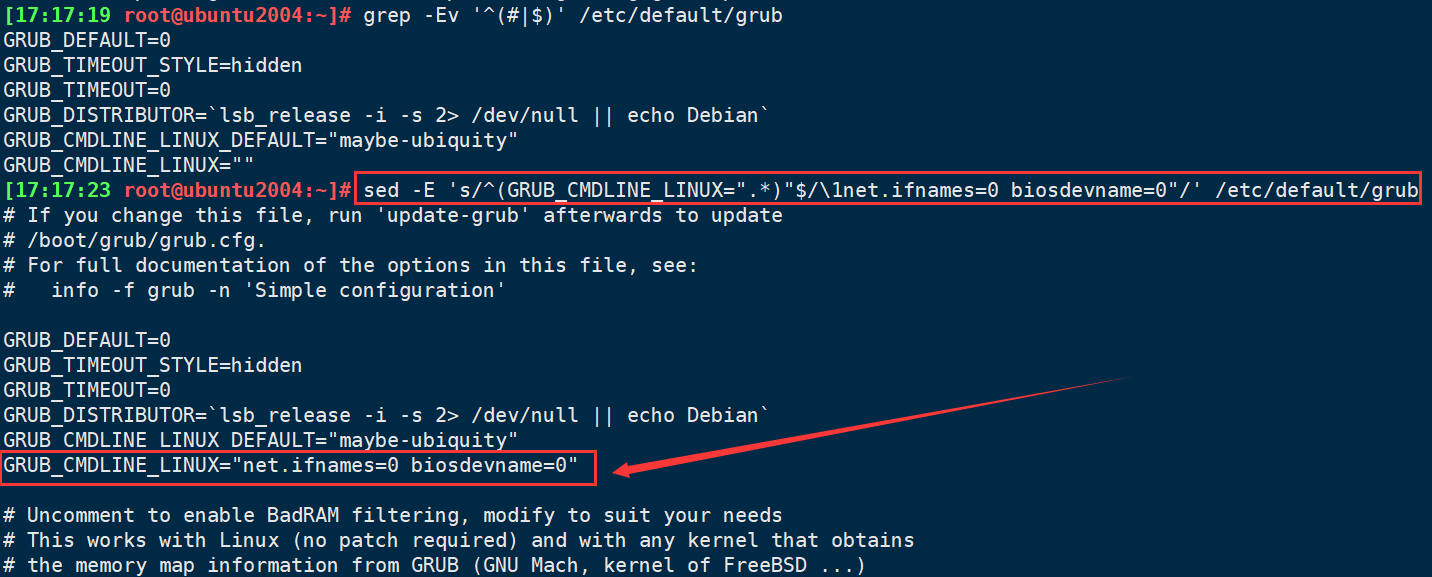

4.7.3.更新grub启动菜单,重启生效
4.7.4.更改配置文件
4.7.5.查看是否生效

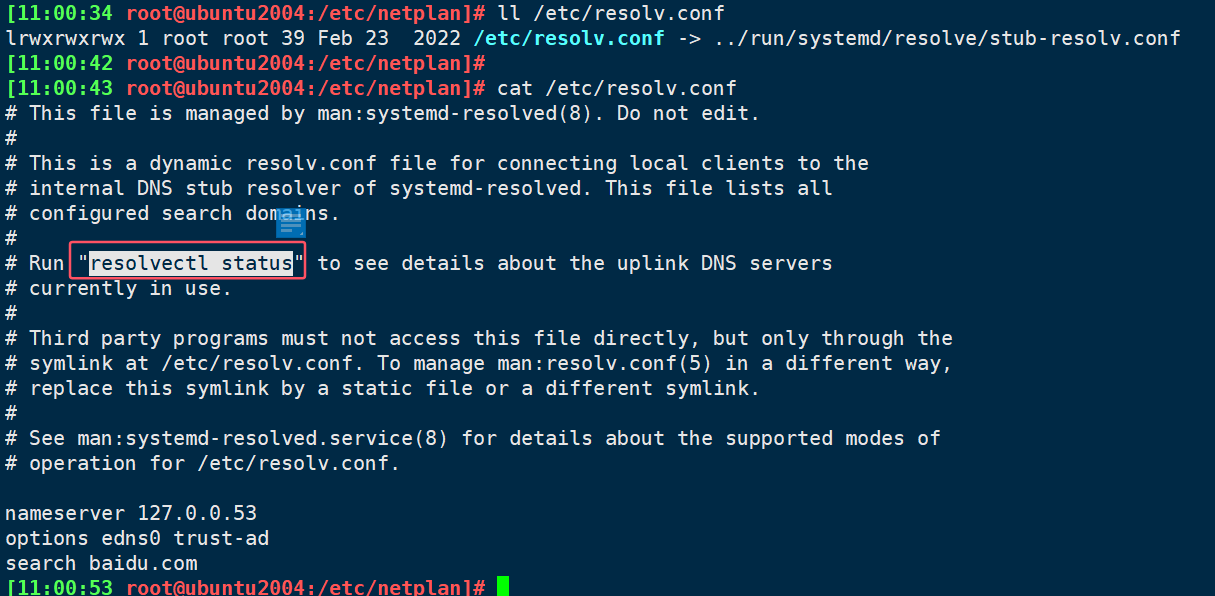
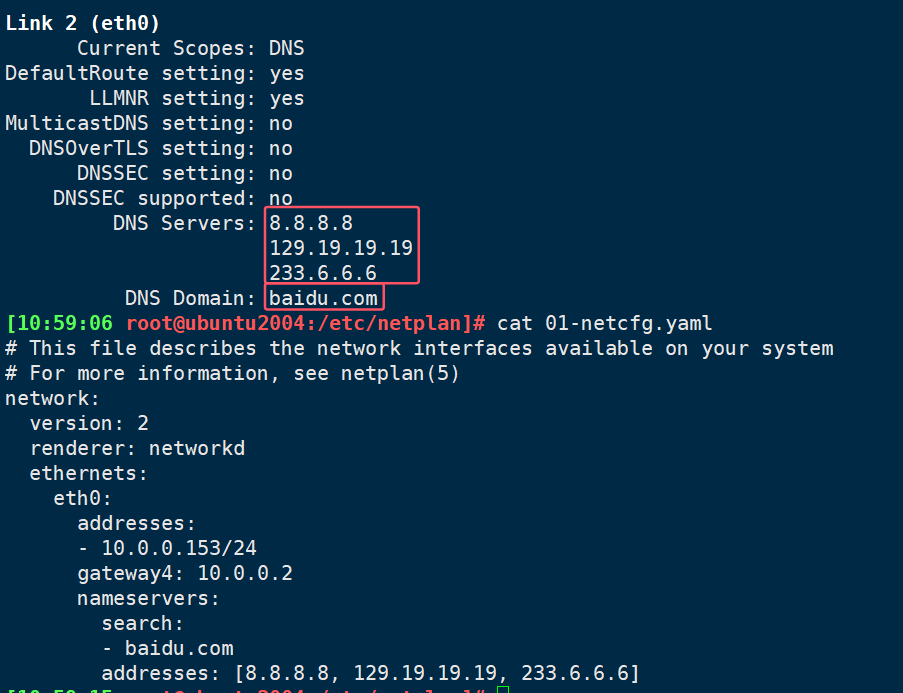
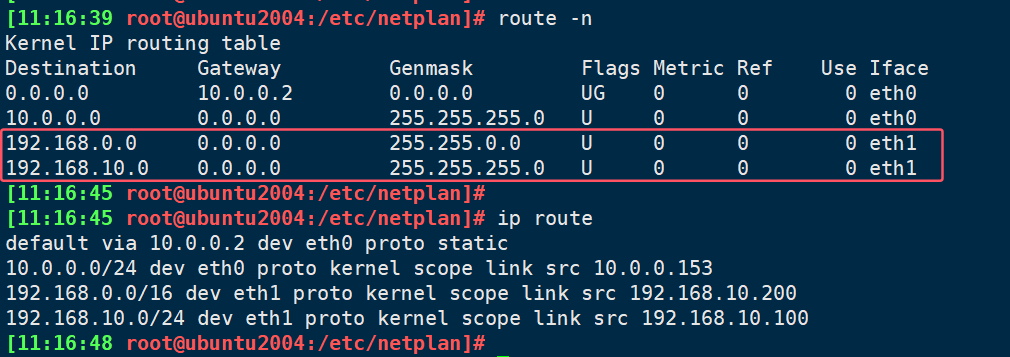
4.7.6.新增加一个网卡
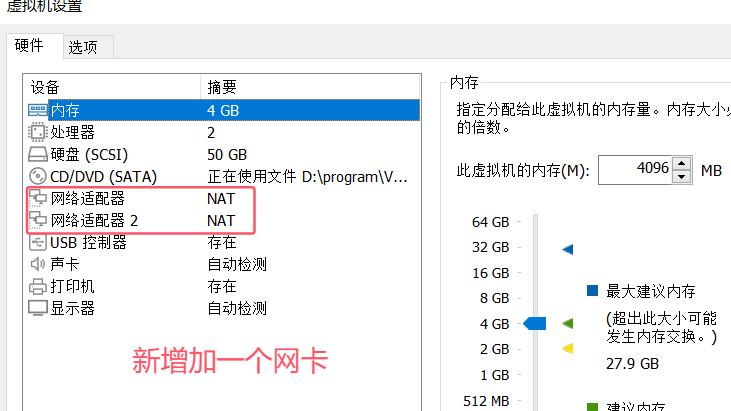

4.7.7.查看是否生效
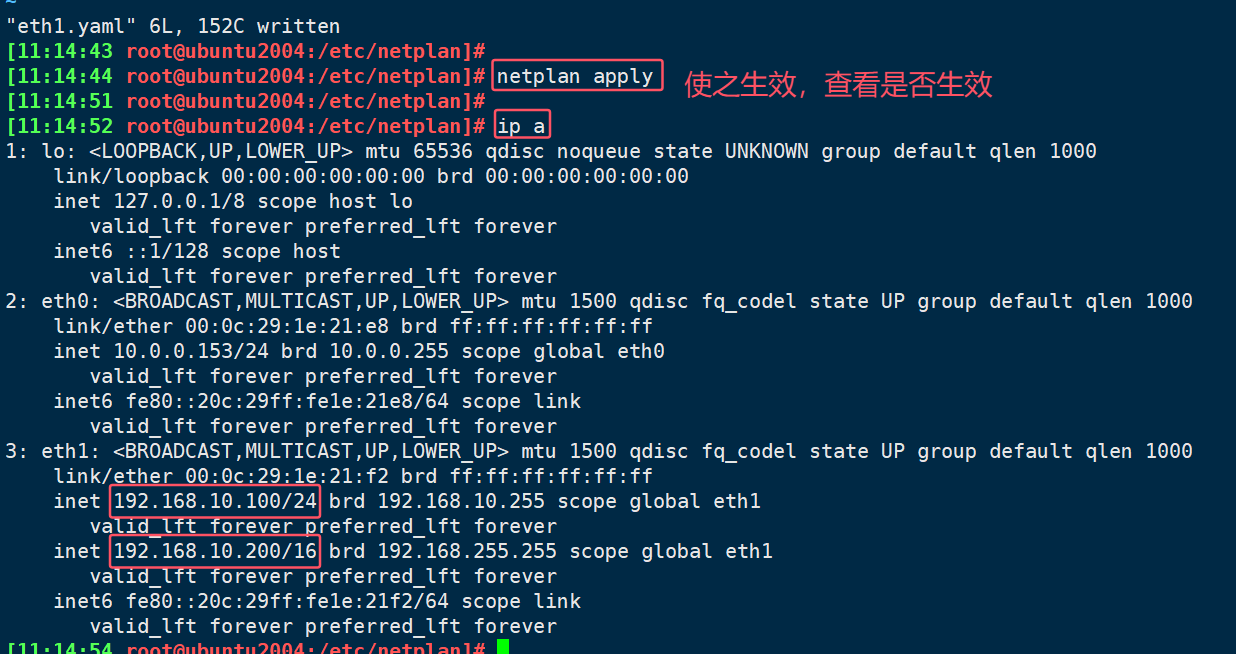
4.7.8.查看路由
4.8.ubuntu2204网卡设置【不同】
vim /etc/default/grub
net.ifnames=0

grub-mkconfig -o /boot/grub/grub.cfg
reboot # 更改网卡名
[20:07:41 root@ubuntu24:~]# chmod 600 /etc/netplan/01.netcfg.yaml
[20:07:41 root@ubuntu24:~]# vim /etc/netplan/01.netcfg.yaml
[20:07:41 root@ubuntu24:~]# cat /etc/netplan/01.netcfg.yaml
network:
version: 2
renderer: networkd
ethernets:
eth0:
addresses:
- 10.0.0.100/24
routes:
- to: default
via: 10.0.0.2
nameservers:
search:
- baidu.com
addresses: [8.8.8.8, 129.19.19.19, 233.6.6.6]
最近在使用Ubuntu Server 22.04做项目开发测试时发现每次重启和关机后,所设置的静态IP地址都会回复到安装系统时所设置的ip
[root@ubuntu24-13:~]# ls /etc/cloud/cloud.cfg.d
05_logging.cfg 90-installer-network.cfg 99-installer.cfg curtin-preserve-sources.cfg
20-disable-cc-dpkg-grub.cfg 90_dpkg.cfg README
[root@ubuntu24-13:~]# vim /etc/cloud/cloud.cfg.d/90-installer-network.cfg
[root@ubuntu24-13:~]# cat /etc/cloud/cloud.cfg.d/90-installer-network.cfg
# This is the network config written by 'subiquity'
network:
ethernets:
eth0:
dhcp4: false
version: 2
[root@ubuntu24-13:~]# echo "network: {config: disabled}" > /etc/cloud/cloud.cfg.d/99-disable-network-config.cfg
[root@ubuntu24-13:~]# cloud-init clean
[root@ubuntu24-13:~]# reboot


- 修改DHCP获取IP地址
- 如果需要修改为DHCP服务器自动获取IP地址,可以配置dhcp4为true
- 如果需要修改为DHCP服务器手动获取IP地址,可以配置dhcp4为false
vim 50-cloud-init.yaml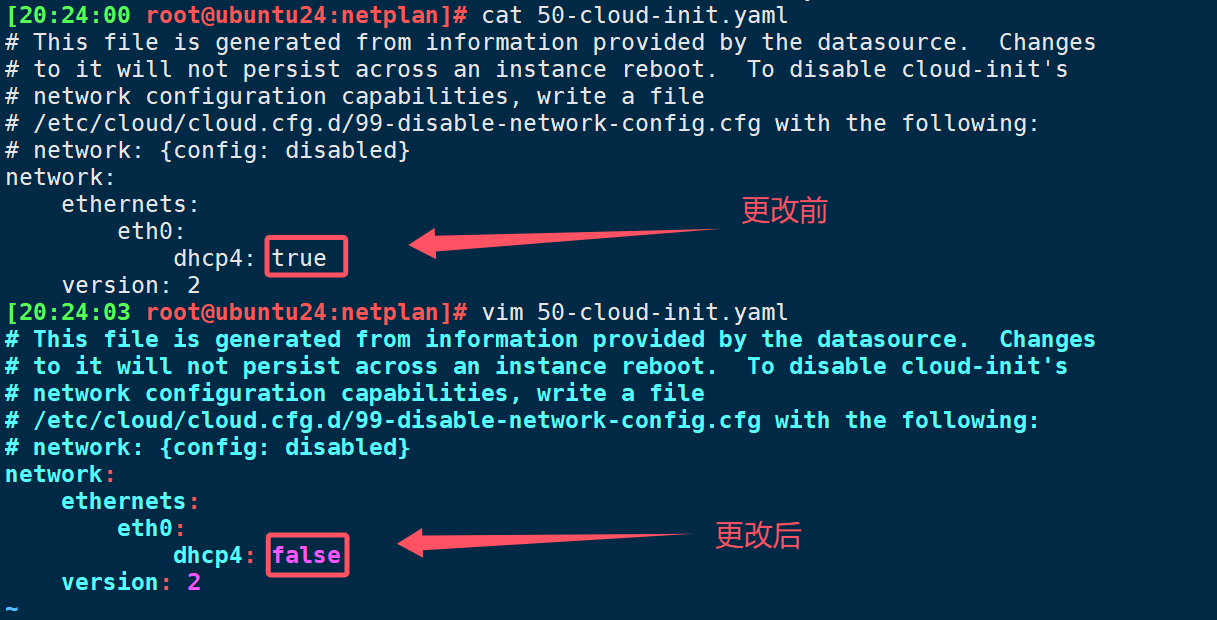


评论